
 Image: lassedesignen / Shutterstock.com
A freshly installed system starts up quickly and responds swiftly. A few updates and new software installations later, however, Windows seems to become slower and slower. There are several ways to find out whether this is just a subjective impression.
Use suitable tools to determine the start times and remove system brakes. Carry out the measurements before and after you make changes to the system. You can then see how successful the measures have been.
Even if Windows already shows the desktop, the startup process is usually not yet complete. The system is often not yet ready for user input, it does not react to mouse clicks, or only reacts with a significant delay. How quickly Windows is ready depends on the programs that Windows starts automatically after login. To speed up the system, you should reduce the number of autostart programs.
It is particularly annoying if you just want to quickly check something in the web browser and Windows is busy installing updates. This can be avoided by temporarily suspending the installation of updates. Or you can start the PC via a timer or the network. Then it will be ready when you need it.
1. Find out the Windows start time
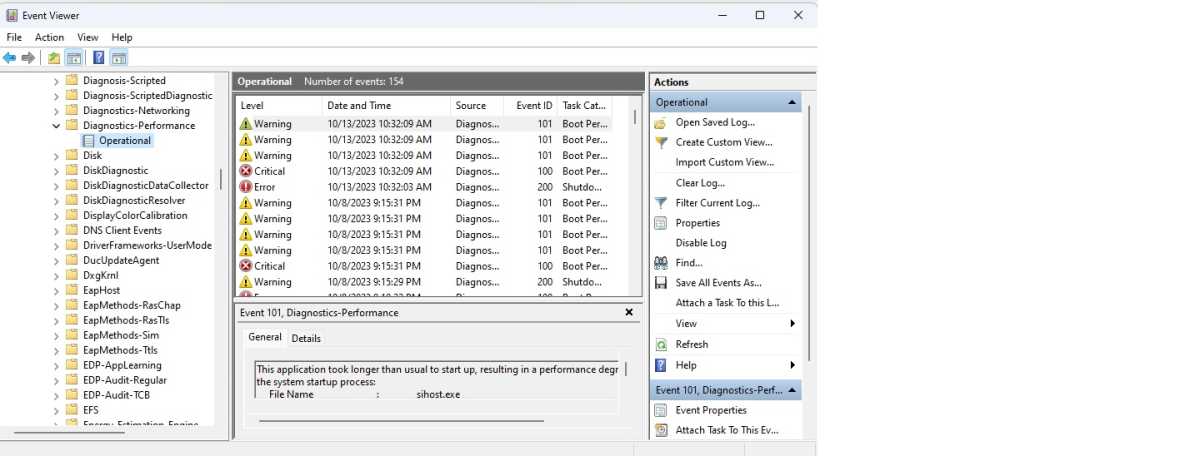
Windows logs: The start times are recorded in the Event Viewer, as are processes that delay the start. Sometimes this is unavoidable, for example with virus scanners.
Windows logs: The start times are recorded in the Event Viewer, as are processes that delay the start. Sometimes this is unavoidable, for example with virus scanners.
Foundry
Windows logs: The start times are recorded in the Event Viewer, as are processes that delay the start. Sometimes this is unavoidable, for example with virus scanners.
Foundry
Foundry
Windows records the times for system startup and shutdown in the event log. The log can be called up by right-clicking on the Start menu button and selecting Event Viewer. Go to Application and service logs > Microsoft > Windows > Diagnostics-Performance > Operational.
In the center of the window, you will see the events that occur when Windows starts up and shuts down. Event IDs between 100 and 199 refer to startup processes, from 200 onwards to shutdown. For IDs 100 and 200, you can see the time required in milliseconds in the lower area behind Startup duration and Shutdown duration.
The IDs from 101 to 199 give you further information on the affected area. Clicking on a message shows a brief description of the problem under General as well as the name of the software that caused the delay. If a problem occurs during shutdown, Windows notes this with IDs from 201 to 299.
Windows 10 or 11: Which is faster?
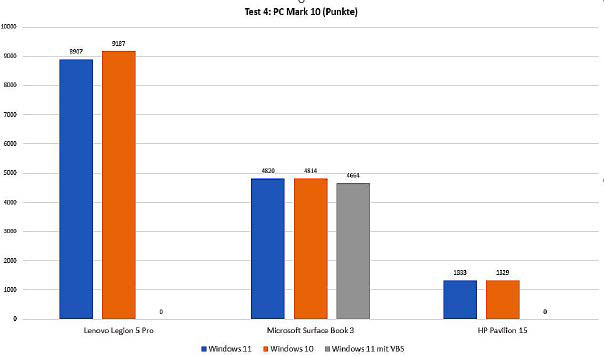
Windows 10 and 11 in comparison: PC Mark 10 shows hardly any differences .
Windows 10 and 11 in comparison: PC Mark 10 shows hardly any differences .
IDG
Windows 10 and 11 in comparison: PC Mark 10 shows hardly any differences .
IDG
IDG
Windows 11 differs from Windows 10 primarily in the visual design of the desktop and some apps. The technical basis is similar for both systems. However, Windows 11 offers improved memory management and prioritizes active apps. Virtual Based Security (VBS) is intended to provide more security by isolating processes so that the system is better protected against malware. This is also one of the reasons why Windows 11 officially requires newer processors and TPM.
Most performance tests show hardly any differences between Windows 10 and 11, with system and program start times being roughly identical. There have been isolated reports that some games run slower on PCs with AMD CPUs under Windows 11. However, these problems seem to have been resolved in the meantime. VBS can also reduce performance in some application areas, but the function can be deactivated if required.
2. Switch off system brakes
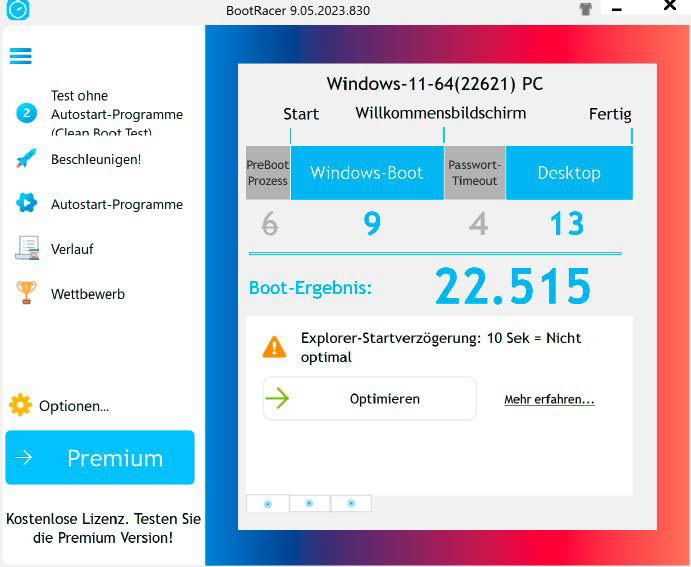
Determine boot times: BootRacer clearly shows how long it took Windows to start up and when the desktop was ready for use. The tool can also deactivate autostart programs.
Determine boot times: BootRacer clearly shows how long it took Windows to start up and when the desktop was ready for use. The tool can also deactivate autostart programs.
IDG
Determine boot times: BootRacer clearly shows how long it took Windows to start up and when the desktop was ready for use. The tool can also deactivate autostart programs.
IDG
IDG
The Bootracer tool can be used to determine boot times. It also shows which autostart programs require how much time. Superfluous time wasters can be deactivated using the tool.
In the tool, click on Test > Complete Windows startup process and then on Start test. Confirm the restart by clicking on Yes. Once the desktop is visible again, Boot Racer automatically displays a progress bar in the bottom right-hand corner showing the number of seconds required to complete the boot process. You will then see a window with the total start time, which you can click on.
The Boot Racer window tells you how long it took to start Windows (“Windows boot”) and how long it took for the desktop to be ready for use (“Desktop”). You can then continue by clicking on “Test without autostart programmes (Clear Boot Test)” and “Start test”. If you now click on the total time, the value under “Desktop” should be lower. Click on “Autostart programmes”. You will now see which autostart programmes are active and the respective start time.
Remove the ticks from the programmes that you do not need or that slow down Windows startup considerably.
3. Optimize Startup
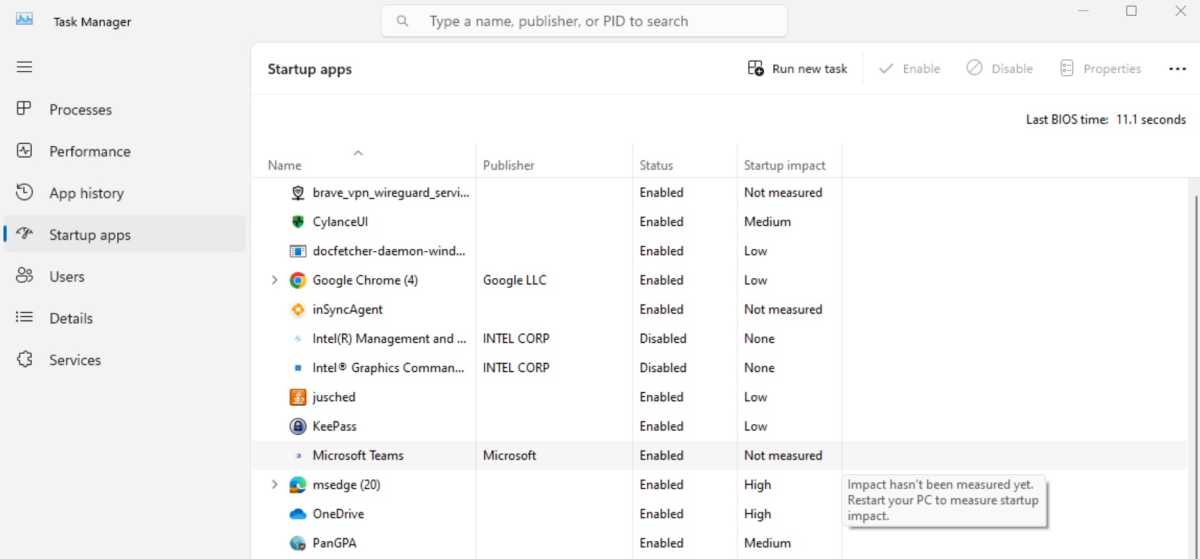
Windows Task Manager: This system tool can be used to deactivate some autostart programs. The time required before Windows starts is shown in the top right: “Last BIOS time.”
Windows Task Manager: This system tool can be used to deactivate some autostart programs. The time required before Windows starts is shown in the top right: “Last BIOS time.”
Foundry
Windows Task Manager: This system tool can be used to deactivate some autostart programs. The time required before Windows starts is shown in the top right: “Last BIOS time.”
Foundry
Foundry
You can also find out which programs Windows starts automatically in the Task Manager, which you start with Ctrl+Alt+Del. In Windows 10, click on More details and go to the Startup apps tab. In Windows 11, click on Startup apps. In the Startup impact column, you can see how much a program is using Windows. A program can be removed from Startup apps via the context menu.
The Task Manager also shows how long it took for Windows to start up after switching on the computer, next to Last BIOS time (only in UEFI mode). The time can be shortened by activating Fast Boot or Quick Boot in the firmware/BIOS setup. This partially omits the hardware check, which can reduce the boot process by a few seconds.
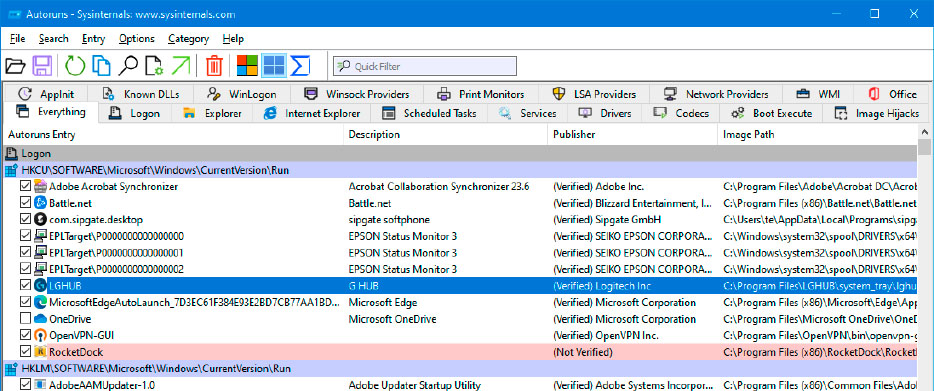
Sysinternals-Autoruns: The tool shows everything that starts automatically with Windows. Remove the tick in front of the programs or services that you do not need.
Sysinternals-Autoruns: The tool shows everything that starts automatically with Windows. Remove the tick in front of the programs or services that you do not need.
IDG
Sysinternals-Autoruns: The tool shows everything that starts automatically with Windows. Remove the tick in front of the programs or services that you do not need.
IDG
IDG
Alternative autostart configuration: Autoruns from Sysinternals/Microsoft recognizes almost all autostart ramps for programs and services and can also display and manage extensions for Windows Explorer and Microsoft Office. In addition to other useful tuning options, Glary Utilities also offers autostart management, which can also process scheduled tasks and services. The special feature: Autostarts can be delayed so that the desktop is ready for use more quickly.
4. Automatic Windows logon
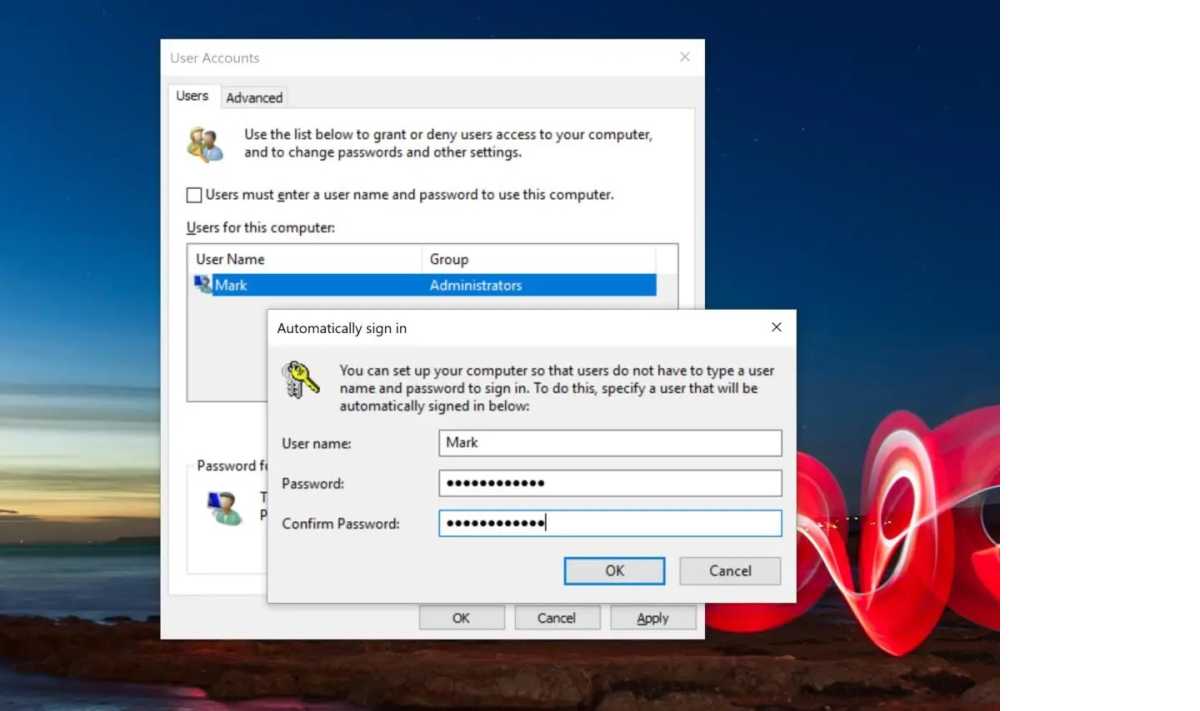
Automatic Windows login: After a change in the registry, Windows 10 and 11 can be configured with Netplwiz to log on without entering a password.
Automatic Windows login: After a change in the registry, Windows 10 and 11 can be configured with Netplwiz to log on without entering a password.
Foundry
Automatic Windows login: After a change in the registry, Windows 10 and 11 can be configured with Netplwiz to log on without entering a password.
Foundry
Foundry
Windows requests a password by default when you log on. If you only use your PC at home, you can probably do without the password. To enable automatic login, Windows 10 and 11 require an adjustment in the registry. Press Win+R, type in regedit and confirm with OK. Go to the key
Hkey_Local_Machine\Software\Microsoft\Windows NT\CurrentVersion\PasswordLess\Deviceand change the value DevicePasswordLessBuildVersion to 0.
Then start via Win+R
NetplwizRemove the tick in front of Users must enter user name and password and click on Apply. Then enter the user name of your local standard account and the corresponding password twice. Next, click OK twice and Windows will start without asking for a password. Automatic login also works with a Microsoft account. After User name, use the email address that you use for logging in.
Tip: Automatic login is of little use if Windows blocks the desktop with a full-screen message, such as “Let us finish setting up your PC” or “Get even more out of Windows.”
If you don’t want to see the screens, you can use the registry files from Disable Welcome. The start assistant of the Edge web browser can also be switched off via the registry. The Mozilla Firefox folder contains configuration files that can be copied to the browser’s installation folder, for example to C:\Program Files\Mozilla Firefox. This can be used to prevent the wizard from appearing after updates.
5. Deactivate Windows updates
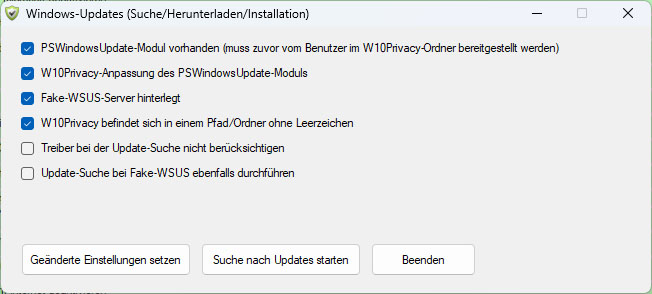
Switch off updates: The automatic Windows update can be deactivated via W10Privacy. If necessary, you can download the updates manually at the desired time.
Switch off updates: The automatic Windows update can be deactivated via W10Privacy. If necessary, you can download the updates manually at the desired time.
IDG
Switch off updates: The automatic Windows update can be deactivated via W10Privacy. If necessary, you can download the updates manually at the desired time.
IDG
IDG
Regular updates are essential for system security. Extensive updates in particular can delay Windows startup for minutes and often require several restarts. Users who want to have more control over updates can simply use W10Privacy.
Step 1: In the tool’s setup wizard, select the Portable Installation option and use a folder whose name does not contain any spaces, such as “C:\Tools\W10Privacy.” Unzip PS Windows Update into this folder so that the file “PSWindowsUpdate.psd1” is located in the folder “C:\Tools\W10Privacy\PSWindowsUpdate.”
Step 2: Start a Powershell as administrator and execute the following command line:
Set-ExecutionPolicy -Scope CurrentUser -ExecutionPolicy Remotesigned This will allow the current user to run Powershell scripts.
Step3: Start W10Privacy via the context menu item Run as administrator. In the menu, go to Extras > Windows updates (search/download/install). Tick the first four options and click on Set changed settings. The tool activates a fake update server so that updates can no longer be downloaded. For a targeted update download, click on Start search for updates. If updates are available, a window will appear in which you can select the updates and then download and install them.
If you want to receive updates in the regular way again, uncheck the box next to Fake WSUS server stored and save the change.
The update function of W10Privacy is not particularly informative and does not provide a progress indicator. Wait after each action until the tool displays a message. More precise monitoring is possible via the log file. You can display changes in it in a Powershell with the line
Get-Content -Path „C:\Tools\W10Privacy\W10Privacy.log“ -Tail 10 -Waitline in a powershell.
6. Use a timer
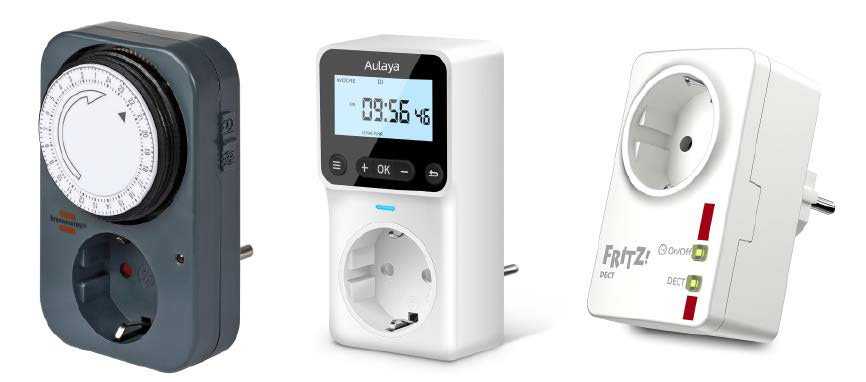
PC start via timer: Timers are available in different designs. Smart sockets can be switched on according to a schedule or via a smartphone.
PC start via timer: Timers are available in different designs. Smart sockets can be switched on according to a schedule or via a smartphone.
IDG
PC start via timer: Timers are available in different designs. Smart sockets can be switched on according to a schedule or via a smartphone.
IDG
IDG
PCs, monitors, and other peripheral devices cause electricity costs, even when they are switched off or in standby mode. It therefore makes sense to disconnect all devices from the power supply via a switch socket when they are not in use.
If you use your PC at a certain time every day, you can use a timer switch, which is available with a mechanical or digital timer at prices between $6 and $25. Even more convenient is a smart socket, which can cost less than $50. This allows a connected power strip to be switched manually via the smartphone or according to a schedule.
To ensure that the desktop PC starts up automatically when the power supply is activated, you need to change a setting in the firmware/BIOS setup. To do this, click the On/Off button at the bottom right of the Windows login screen or, after logging in, click the On/Off button in the Start menu. Hold down the Shift key and click on Restart in the button menu. Go to Troubleshooting > Advanced Options > UEFI Firmware Settings and click on the Restart button. In the firmware/BIOS setup, search for a menu item such as Power Management Setup or Platform Power. For options such as Restore after AC Power Loss or AC Back, activate Power on, Always on, or similar.
Shut down Windows and then disconnect the PC from the power supply. As soon as the power supply is restored, the computer will switch on automatically and Windows will start. If you use a timer to set the switch-on time to just before you start work, the computer will be ready for use as soon as you need it.
7. Start Windows automatically
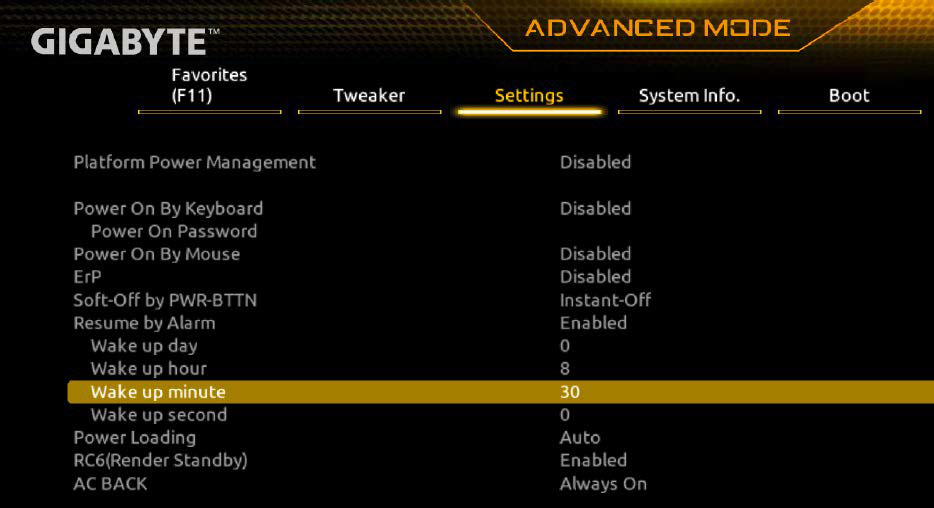
Timer in the firmware: With many desktop PCs, it is possible to set a switch-on time in the firmware setup. This means that the PC is ready for use when you need it.
Timer in the firmware: With many desktop PCs, it is possible to set a switch-on time in the firmware setup. This means that the PC is ready for use when you need it.
IDG
Timer in the firmware: With many desktop PCs, it is possible to set a switch-on time in the firmware setup. This means that the PC is ready for use when you need it.
IDG
IDG
A computer can also be started automatically without a timer. Desktop PCs often have an option such as Resume by Alarm in the firmware setup (see point 7). This allows the timer to be configured — for example, for a daily auto-start at the start of work. It is usually not possible to select specific days of the week. The computer switches on at the selected time regardless of the operating system. It does not matter whether you have shut down Windows or put it to sleep (see box on this page).
8. Start Windows remotely
If you do not want to set a fixed schedule for starting the system, you can activate the computer at the desired time using Wake-on-LAN (WOL) via your smartphone, for example. Wake-on-Lan was developed for Ethernet adapters, but also works with some WLAN chipsets in notebooks if the firmware supports it.
In the firmware/BIOS setup (please refer to point 7), set all options for Wake-on-LAN to Enabled, if available. Under Windows, start the Device Manager. In the context menu of the network adapter, go to Properties and then click on the Advanced tab. Here there are options such as Wake on magic package, Wake on pattern match, Activation by magic packet, or similar. Activate all options that relate to Wake on Lan. Go to the Power management tab and tick the three available options.

Configure the network adapter: You can activate Wake-on-LAN for almost all network adapters. Windows can then be reactivated via the network.
Configure the network adapter: You can activate Wake-on-LAN for almost all network adapters. Windows can then be reactivated via the network.
Foundry
Configure the network adapter: You can activate Wake-on-LAN for almost all network adapters. Windows can then be reactivated via the network.
Foundry
Foundry
WOL can be used to wake up a PC that is in Energy saving or Hibernation mode. WOL can also work after Shut down. If not, start powercfg.cpl via Win+R and click on Select what should happen when power switches are pressed. Click on Some settings are currently not available and then remove the tick next to Enable quick start (recommended).
Try Wake-on-LAN with the Nirsoft tool Wakemeonlan, which you can download from the Windows System Control Center (WSCC) and copy to another computer. Go to File > Start scanning. The tool searches for computers in the network and displays their IP and MAC addresses. Then shut down the PC that you want to wake up via WOL. In Wakemeonlan, select Wake Up Selected Computers in the context menu for this computer and confirm with Yes.
Control via an Android phone: Install the Wolon – Wake on LAN Widgets app on your smartphone. The app is ad-financed, the Pro version without adverts, and with extended functions the app costs $3.99.
After starting the app, go to Network scan in the menu and then to Start network scan. Select the desired PC and tap on LAN list. Accept the MAC address from Wakemeonlan. Click on Save. You can now wake up the PC in the main window by tapping on the configured entry.
Wake up Windows via the internet: In the Android app Wolon, the configuration can also be saved in the WAN list. In addition to the MAC address, you must enter the public IP of the router or its host name here. As the IP number changes regularly with most internet providers, you usually have to use a DynDNS service so that your home network can always be reached via a domain name. Port forwarding from any external port to port 9 on the PC must also be set up in the router. An alternative to this is a VPN connection to the home network.
9. Faster with an SSD
Windows runs significantly faster when the system boots from an SSD. The performance gain is so significant due to the short access times that investing in an SSD is also worthwhile for older PCs and notebooks. AS SSD Benchmark can be used to determine the speed of hard disks and SSDs. Hasleo Backup Suite Free can move the system from the hard drive to an SSD.
If you stay with the hard drive, you should defragment the drive from time to time. Auslogics Disk Defrag can be used to defragment particularly large files, for example from games or virtualization software, which speeds up access.
See our roundup of the best SSDs for recommendations.
Shut down, save energy, and hibernate
Windows can be shut down in different ways. If you select Shut down via the On/Off button in the Start menu, Windows closes all applications and the user session and writes parts of the RAM with the image of the kernel to the Hiberfil.sys file on the start hard drive. The PC then switches off.
The next time it is started, Windows transfers the contents of the file back to the RAM and the system is quickly available again. For this to work as described, Quick start (see point 9) must be activated in the energy settings, which is the case by default. The situation is different with Restart. In this mode, Windows is completely shut down and restarted.
Save energy: In this mode, the RAM modules continue to be supplied with power. The contents of the main memory are retained. Waking up from Save energy mode is significantly faster than restarting after Shut down. In addition, started applications remain open so that you can continue working where you left off. Ideally, you only need three seconds to be able to work with the system.
Hibernation mode: If you disconnect the PC from the power supply using a power strip with a switch, you should use this mode. Windows stores the contents of the main memory in the Hiberfil.sys file and the main memory is no longer supplied with power. By default, Windows does not offer Hibernation in the menu on desktop PCs. To change this, activate hibernation via powercfg.cpl (see point 9).
This article was translated from German to English and originally appeared on pcwelt.de.
Author: Thorsten Eggeling

Thorsten Eggeling schreibt seit gut 20 Jahren Artikel für die PC-WELT.
Recent stories by Thorsten Eggeling:
14 Windows tools and tricks that save you serious timeWindows 12: How to try tomorrow’s new features, today8 deeply hidden, truly useful Windows features


