
 Image: IDG
It took Microsoft a long time to integrate virtual desktop functions into its operating system. While virtual desktops had been established under Linux and macOS for years, they only made their way onto PCs with the release of Windows 10 in 2015. However, because many long-time Windows users are reluctant to change how they use the system, virtual desktops lead a relatively shadowy existence in the Microsoft world. And unjustly so, because their practical benefits are often overlooked.
For one thing, they create additional space on the screen and thus provide a better overview of all of your work. Secondly, the desktop extension makes it easier to work on different tasks—after all, different tools are needed when playing games or editing pictures. Temporary projects such as planning a trip can also be easily grouped together on an additional desktop and at the same time separated from the rest of your work. This increases convenience without user accounts or similar alternatives.
This article was translated from German to English, and originally appeared on pcwelt.de.
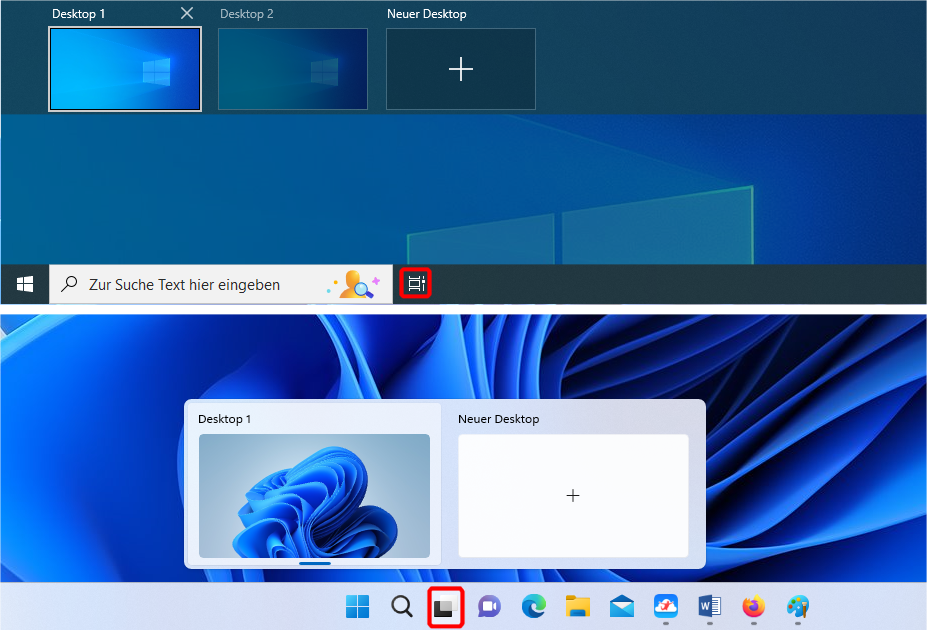
The icon for creating virtual desktops differs in Windows 10 (above) and 11 (below), but the functions and handling are essentially the same.
The icon for creating virtual desktops differs in Windows 10 (above) and 11 (below), but the functions and handling are essentially the same.
IDG
The icon for creating virtual desktops differs in Windows 10 (above) and 11 (below), but the functions and handling are essentially the same.
IDG
IDG
Here we’re going to bring the virtual desktop function out of the shadows and explain how to use it. Since the introduction of Windows 10, Microsoft has expanded the operation and possibilities of virtual desktops several times, the following explanations refer to the current versions (22H2) of Windows 10 and 11, with clear differences between the two operating systems.
Also, because virtual desktops cannot and should not replace multi-monitor operation, we explain the use of two or more screens at the end of this guide.
Virtual desktops are essentially a desktop extension
So what exactly do virtual desktops do and how does one work with them? While usually we only talk about “the” desktop and mean the one desktop you’ve used since the advent of personal computers, a virtual desktop means an additional mirrored desktop running separately but containing all of the same data as your original. Instead of squeezing all the important programs, links, and data onto one surface, you spread them over two or more. You can quickly switch between them with just the click of a mouse or a keyboard shortcut.
However, the term “virtual” is misleading in that all desktops have equal rights and are therefore of equal value in Windows 10 and 11. Therefore, Windows does not limit its number of virtual desktops. This is different from the virtual PC, where the simulated hardware is subject to considerable restrictions.
In practice, however, one can usually get by with just a handful of virtual desktops. It might be better to consider a virtual desktop in Windows as something of a second desktop or a desktop extension.
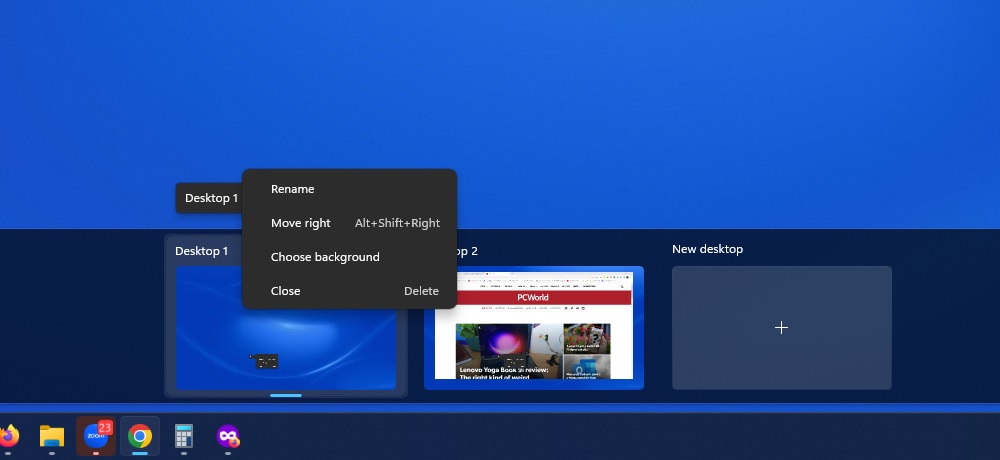
“Desktop 1”, “Desktop 2” and so on, the extensions can be freely named. However, the background can only be changed in Windows 11, not in Windows 10.
“Desktop 1”, “Desktop 2” and so on, the extensions can be freely named. However, the background can only be changed in Windows 11, not in Windows 10.
Foundry
“Desktop 1”, “Desktop 2” and so on, the extensions can be freely named. However, the background can only be changed in Windows 11, not in Windows 10.
Foundry
Foundry
To create a new desktop, click the Task View icon in the taskbar in Windows 10. By default, you will find it immediately to the right of the combined Search and Run box. Click on + New desktop at the top left to create an additional virtual desktop. You will then see the two Windows desktops labelled “Desktop 1” and “Desktop 2” at the top.
In principle, virtual desktop creation works in the same way under Windows 11, but here the Task View icon is different, as is the location of your new desktops. The image at the top of this article clearly shows the differences between the two operating systems.
As soon as you have created your first additional desktop, click on the icon in the taskbar again and select one of the two desktops. It is best to try it out as you go, that way you can understand how it works more quickly. Play around here to familiarize yourself with the virtual desktop creation function. Don’t worry, you can’t break anything in the process, even deleting a desktop is harmless. Also, something to note is that open windows with unsaved contents are not lost, but are automatically moved to another desktop.
Tip: If the desktop icon for the virtual desktops is missing from your taskbar, add it by right-clicking on a free space in the taskbar. Under Windows 10, select Show Task View button. And under Windows 11, right-click the taskbar and select Taskbar settings, where you will see a toggle to turn the Task View on.
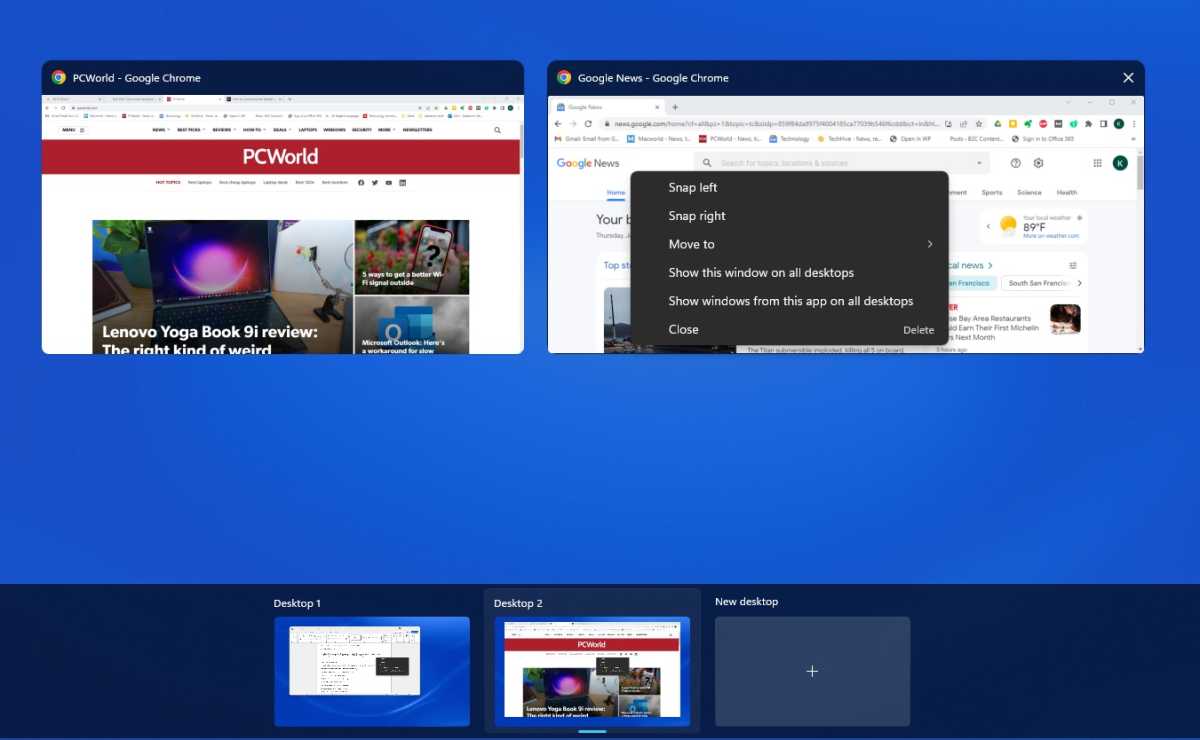
Below, the virtual desktops in the overview; above, the open windows of the active desktop. The context menu allows various actions.
Below, the virtual desktops in the overview; above, the open windows of the active desktop. The context menu allows various actions.
Foundry
Below, the virtual desktops in the overview; above, the open windows of the active desktop. The context menu allows various actions.
Foundry
Foundry
Working with additional desktops in practice
Tip: Most of the virtual desktop’s important functions can also be quickly accessed via shortcut instead of with the mouse:
Win-Ctrl-D: Create new virtual desktopWin-Tab: Display the contents of the various desktops. Unlike Alt-Tab, the preview is retained even after the keys are releasedWin-Ctrl-Arrow right/left: Show contents of the next or previous virtual desktop Win-Ctrl-F4: Close current virtual desktop
If you click on the Task View button and have already created at least one other desktop, Windows will highlight the current actively used desktop. As you select each desktop, you’ll be able to see the currently open windows in that particular desktop.
By clicking on one of these thumbnails you can bring it to the foreground, or by dragging and dropping the window you’re able to move it to another desktop. Clicking on another desktop will open it, while hovering the mouse over a desktop (without clicking) displays a preview of the open windows of that desktop. From this preview you can bring a running application to the foreground by clicking on it or move it back to the active desktop by holding down the mouse button.
It sounds complicated, but once you play around with it you’ll notice it’s actually quite simple and intuitive.
Other important virtual desktop settings can be found by right-clicking a desktop application preview
If you right-click on one of the running applications in the desktop overview, you can Show this window on all desktops or Show windows from this app on all desktops. So while the first option is limited to the one window, the second covers all windows of an application.
For example, if you work with browser windows instead of tabs, they will be available on all workspaces. You can also access standard software such as email and word processing immediately without having to switch the desktop first. These are nuances that you can adjust individually or change again at any time.
If you right click a desktop application preview, you can select Move to > “Desktop 2” (or “Desktop 3,” or “New Desktop”), which will do the same as moving the window via drag and drop. Also, Dock left or Dock right fixes the selected window on the left or right half of the screen.
When using Windows 11, docking is limited to left and right—the other arrangement options (snap layouts) are not available here.
Individualizing the desktops, backgrounds, and other settings
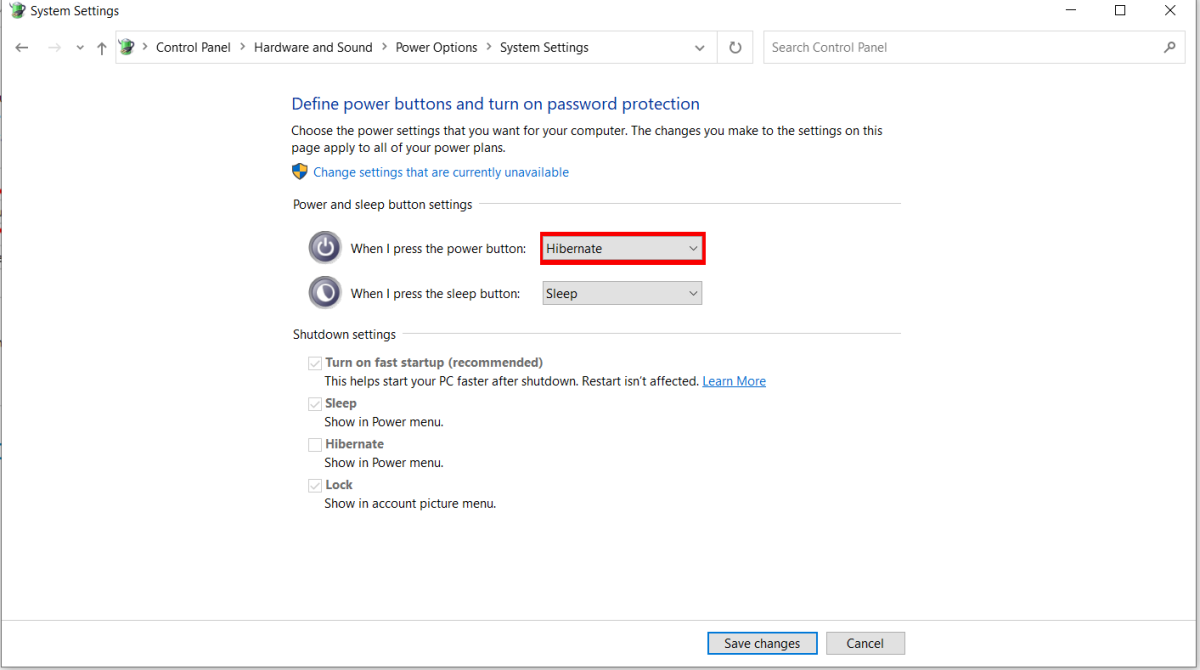
In the so-called hibernation mode, Windows also preserves the contents of the virtual desktops so that they are immediately available again after the PC is started.
In the so-called hibernation mode, Windows also preserves the contents of the virtual desktops so that they are immediately available again after the PC is started.
Sam Singleton
In the so-called hibernation mode, Windows also preserves the contents of the virtual desktops so that they are immediately available again after the PC is started.
Sam Singleton
Sam Singleton
Just as you would name hard disk folders, you should also do this for the desktops themselves. This can be done via Rename when you right-click on a desktop in the Task View menu. This will likely make navigating between desktops or projects easier than using the standard numbering by Microsoft. Under Windows 11, each virtual desktop can also be assigned an individual background, which makes it even easier to distinguish between them. Unfortunately this feature is still missing in Windows 10, although it was already implemented in various Insider builds (i.e. the pre-release versions).
It’s important to note that while the operating system saves the names as well as backgrounds (Windows 11 only) of the virtual desktops, the content open on the desktop will be lost when the PC is shut down and restarted. To fix this, you can choose Sleep or Hibernate as the shutdown option under Power Options. In hibernation mode, the computer does not consume any power, rather the system writes the contents of the main memory to the hard disk before shutting down and reads them from there when “switching on” again.
In this way, you continue working in the same state where you left off before. If hibernation is not immediately available on your computer, activate it in the Control Panel under Hardware and Sound > Power Options > Choose what the power buttons do.
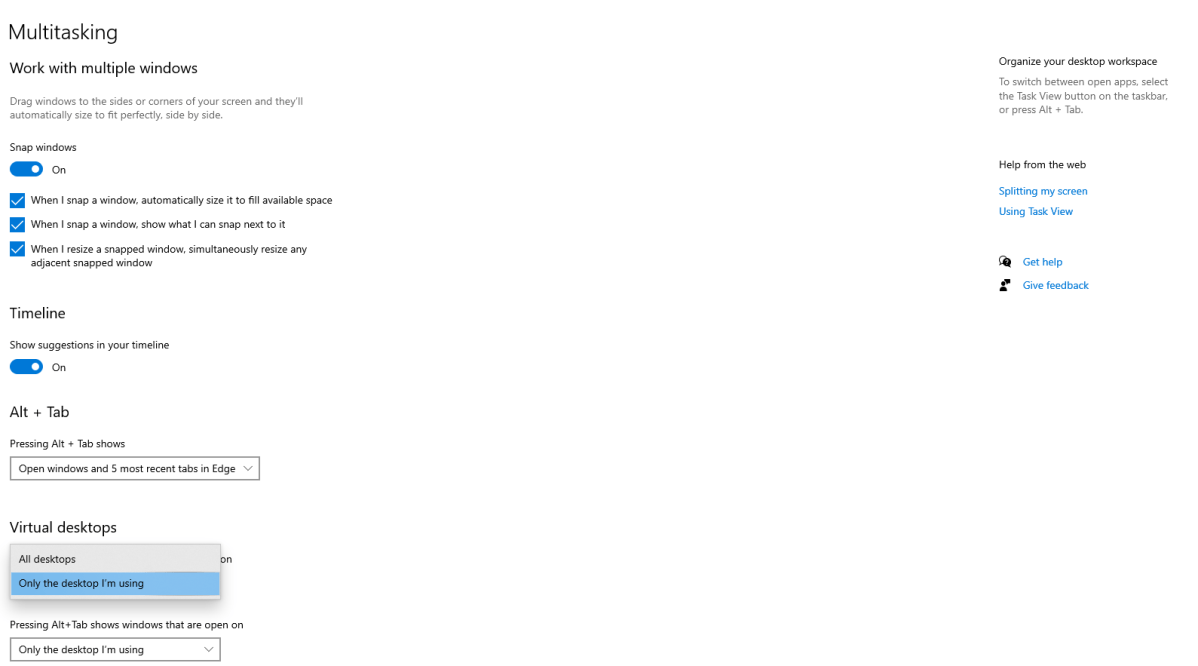
You can set whether open windows are to be displayed system-wide or only in the active virtual desktop.
You can set whether open windows are to be displayed system-wide or only in the active virtual desktop.
Sam Singleton
You can set whether open windows are to be displayed system-wide or only in the active virtual desktop.
Sam Singleton
Sam Singleton
Finally, you can determine which icons in the taskbar should be visible when using the desktop extensions. To do this, open the Settings app of Windows and click on System > Multitasking. In Windows 10 under Multitasking you can directly select the options for displaying open windows; on Windows 11, an extra click on Desktops is required. The setting of the second feature (Alt-Tab) should depend on how many windows you usually open. While the option All desktops offers quick shortcut access to all open applications across all desktops, the convenience of overview is quickly lost with three or four virtual desktops and too many windows.
The desktop alternative: Windows in multi-monitor mode
Most PCs offer the option of connecting more than one monitor, either via two or more HDMI ports, USB-C, DisplayPort, VGA, or a combination of different connections. The same applies to a second monitor on the laptop, which can serve either additionally or exclusively as a large display. If you’re using a laptop, a portable display that doesn’t require a 230-volt power connection but receives its power from the integrated battery or via USB from the notebook is a great option if you’re on the move and want additional desktop space. For more info about these options, see our roundup of the best portable monitors and check out our roundup of the best monitors for even more display options.
Two or more monitors can be configured in the Windows settings under System > Display. You can read more about this process in our article for how to set up two monitors. If you decide to go with a second monitor, you should know that virtual desktops cannot currently be distributed to different screens in multi-monitor mode.
This article was translated from German to English, and originally appeared on pcwelt.de.
Author: Peter Stelzel-Morawietz

Peter Stelzel-Morawietz schreibt über die Themen vernetztes Zuhause, Windows, Internet und Internet of Things, Cloud, GPS und Navigation, Digitalradio sowie IT im Alltag und Integration im Auto
Recent stories by Peter Stelzel-Morawietz:
How to reset Microsoft Edge’s browser settingsMidnight Commander revives the spirit of Norton’s long-dead file managerWindows: How to only allow software from the Microsoft Store


