
 Image: Jared Newman / Foundry
For me, the Steam Deck’s “a-ha” moment came when I figured out how to play the PC version of Stranglehold without a mouse and keyboard.
The John Woo-produced, somewhat underappreciated third-person shooter didn’t include controller support when it launched on Windows in 2007 and neither did the re-release on GOG a few years ago. That and some other odd display issues kept me from ever giving it a try on my gaming PC.
But after sideloading the game through Steam Deck’s desktop mode, Valve’s button remapping tool saved the day. This Steam Deck feature is so extensive that you can get practically any game to work well with the portable console’s thumbsticks, triggers and buttons, and I’ve since used it to breathe new life into other old PC games as well.
Here’s an in-depth guide to everything Steam Deck’s button remapping can do:
How to find the Steam Deck’s button remapper
Jared Newman / Foundry
Jared Newman / Foundry
Jared Newman / Foundry
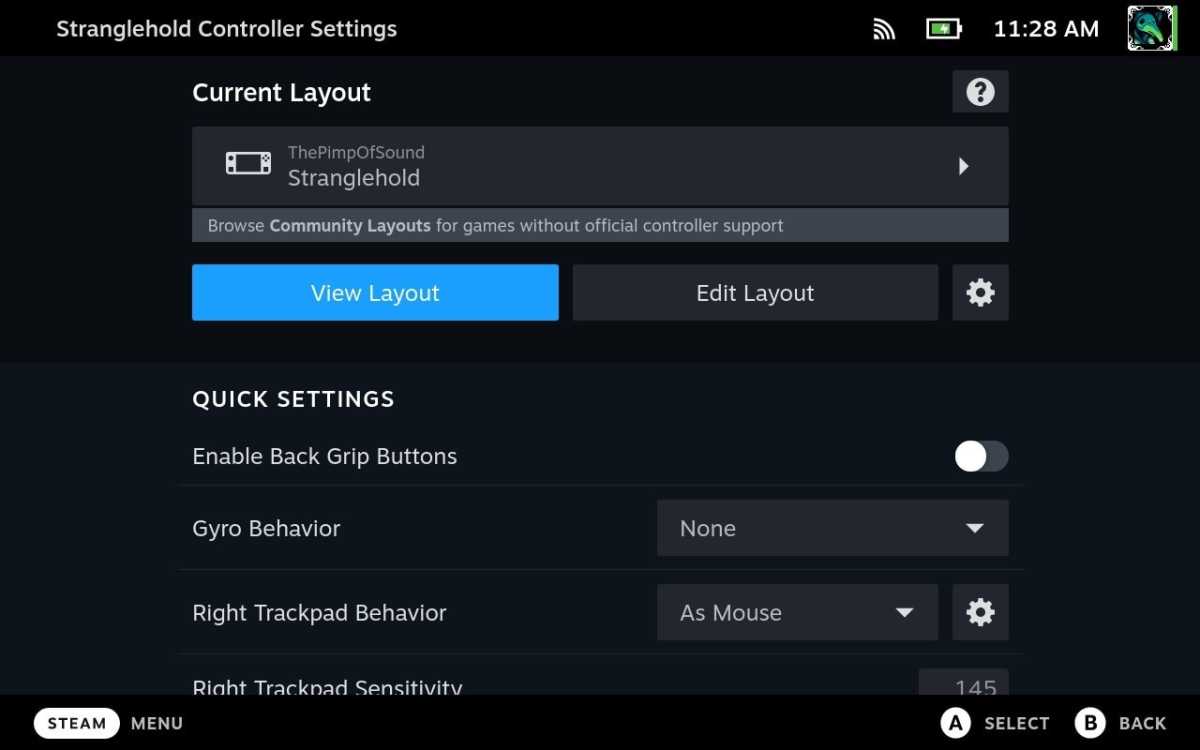
Once you’ve loaded a game on the Steam Deck, hit the Steam button, select “Controller Settings,” then press the A button again.
Scroll down from here and you’ll find some quick settings such as Y-Axis inversion and sensitivity levels for the mouse and trackpad. Keep in mind that these are independent of the in-game control settings, so I would only make adjustments here if the game itself doesn’t offer them.
Still, those quick settings only hint at what’s possible. To truly take advantage of Steam Deck button mapping, you’ll need to create your own layout. Pick a PC game from your library with poor or non-existent controller support, then read on for details.
Creating a Steam Deck controller layout: The basics
Jared Newman / Foundry
Jared Newman / Foundry
Jared Newman / Foundry
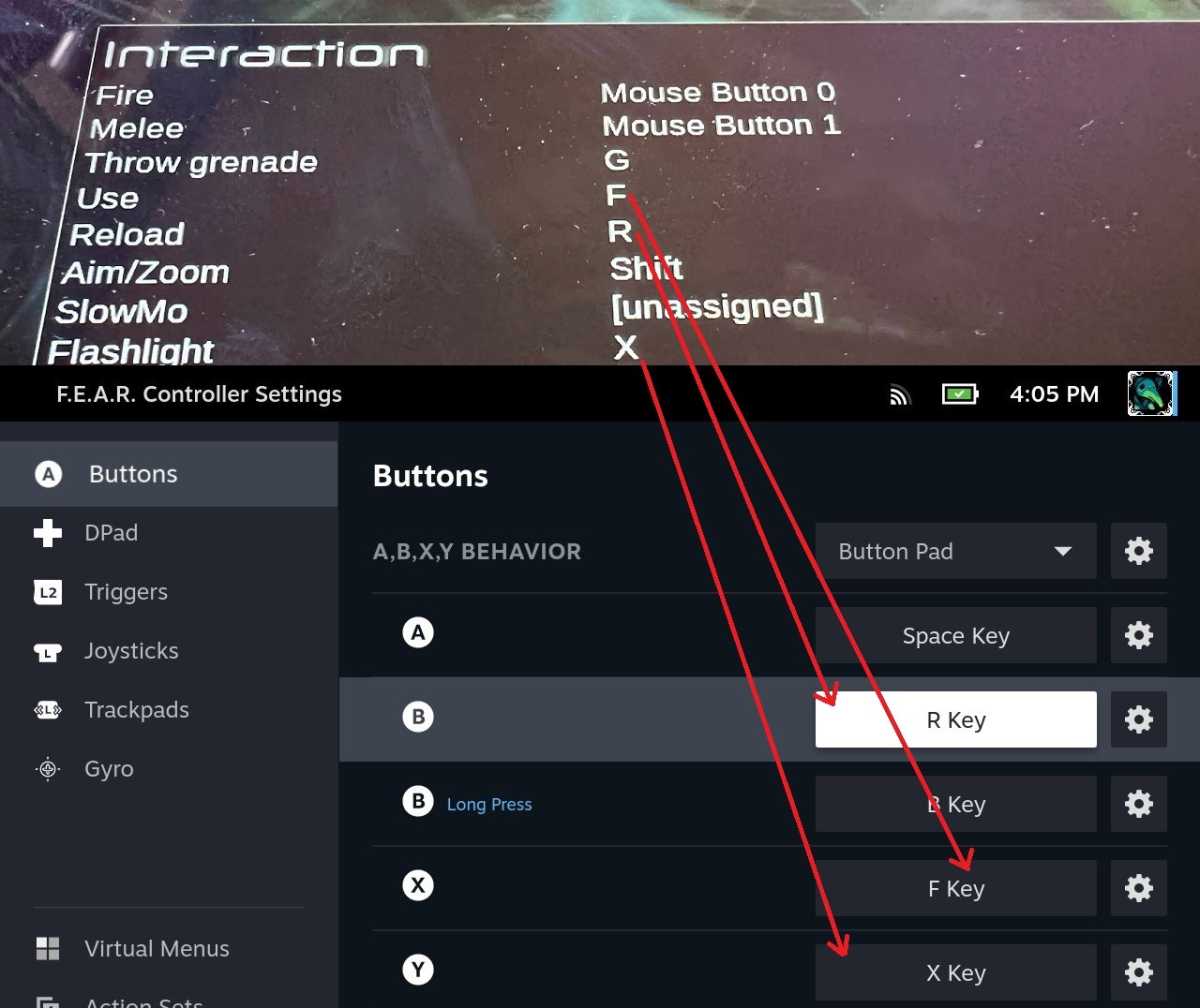
Before building your own Steam Deck controller layout, you should visit the game’s control menu first. Using your phone, take pictures of the game’s keyboard and mouse assignments so you can reference them along the way. Trust me, this will make the remapping process much less tedious.
For this tutorial, I’m going to use F.E.A.R. as an example, as the first-person shooter format does a great job demonstrating everything you can do with button remapping. (That, and I’ve been wanting to get the game off my backlog anyway.)
Here’s an overview of how remapping works:
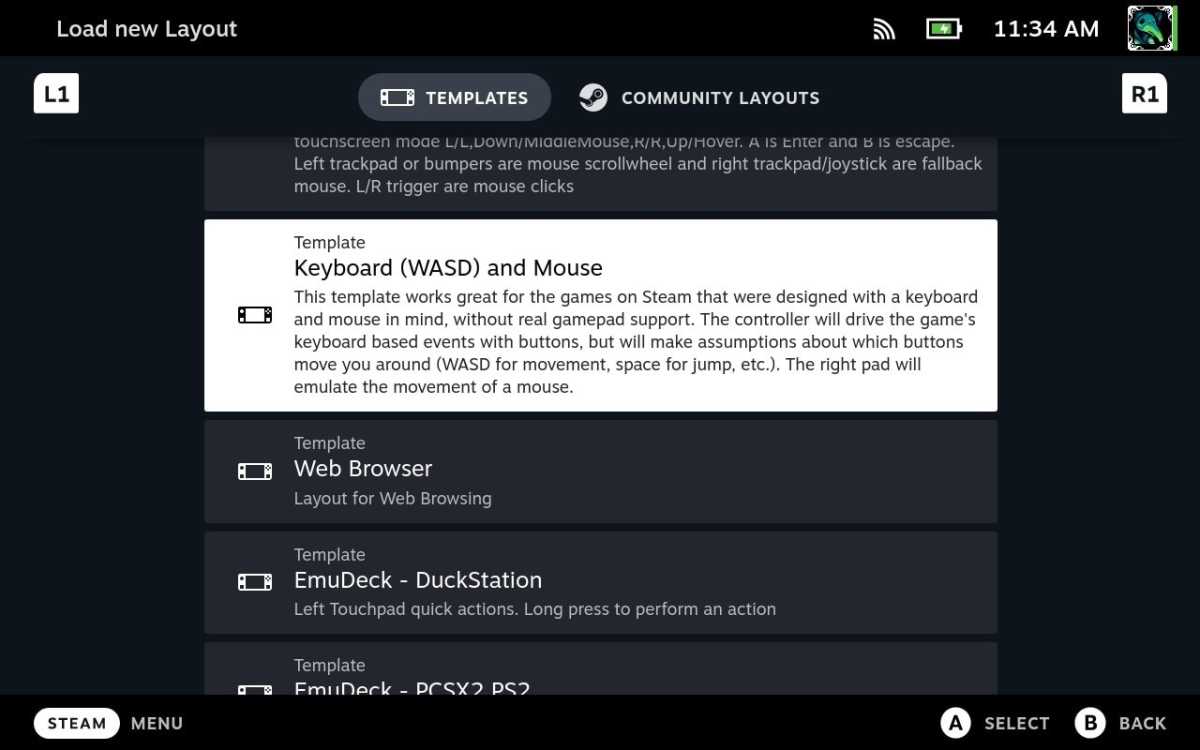
From the Controller Settings menu, select the current layout, then select the Templates menu.Scroll down and select “Keyboard (WASD) and Mouse.” This maps the left stick to the WASD keys and emulates mouse movement with the right stick.From the Controller Settings menu, select Edit Layout.Use the left sidebar to choose between the physical controls on your Steam Deck.Use the right-hand menu to assign commands to those controls.
Jared Newman / Foundry
Jared Newman / Foundry
Jared Newman / Foundry
In the image above, I’ve set the Steam Deck’s face buttons to correspond with keyboard commands for some common actions in F.E.A.R., including Jump, Use, Flashlight, and Reload. (We’ll get into the long-press behavior later.)
Once you’ve mapped those face buttons, you can move on down the left sidebar to map the Steam Deck’s thumbsticks, triggers, D-Pad, trackpads, and rear buttons. You can map those controls to pretty much anything, including mouse buttons, the scroll wheel, and even system actions like the screenshot function.
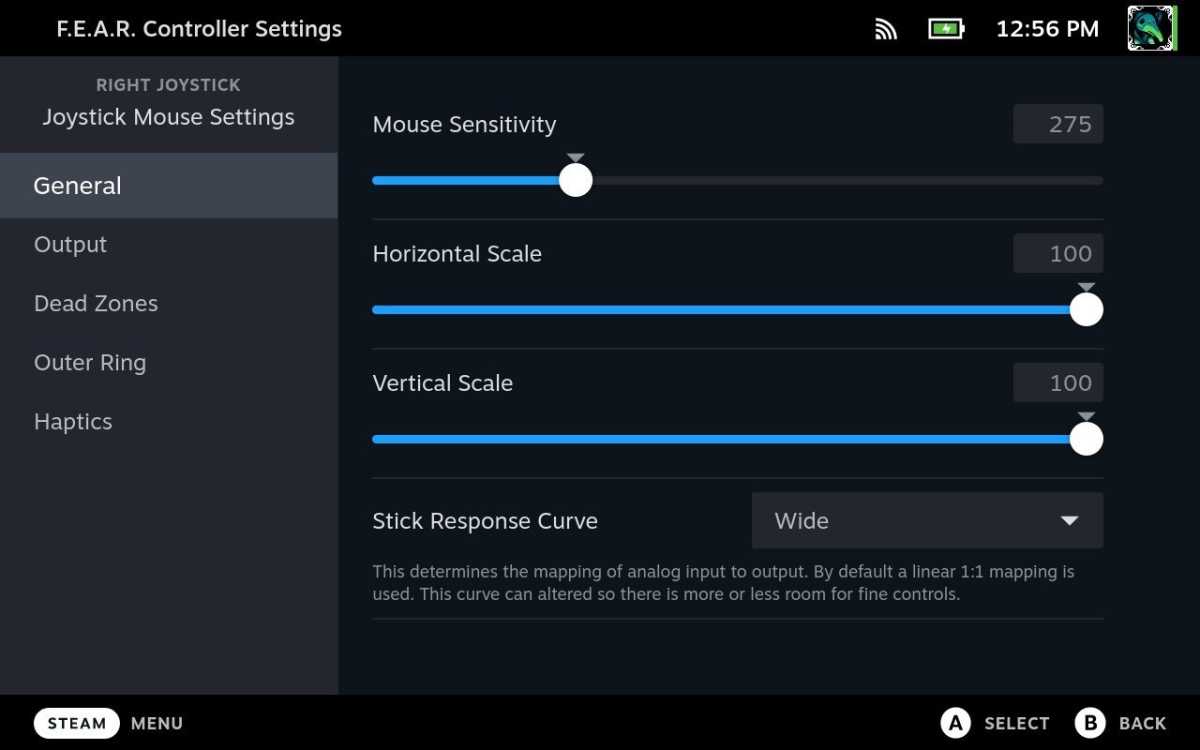
While most of this is pretty straightforward, pay special attention to the Joysticks tab, and in particular the ⚙ gear icon next to “Right Joystick Behavior.” From here you can adjust the sensitivity, scale, and dead zone for mouse emulation, which is especially useful when mapping first- and third-person shooters. You’ll likely need to fine-tune the sensitive as you go, but you can do this later through the quick settings menu.
Jared Newman / Foundry
Jared Newman / Foundry
Jared Newman / Foundry
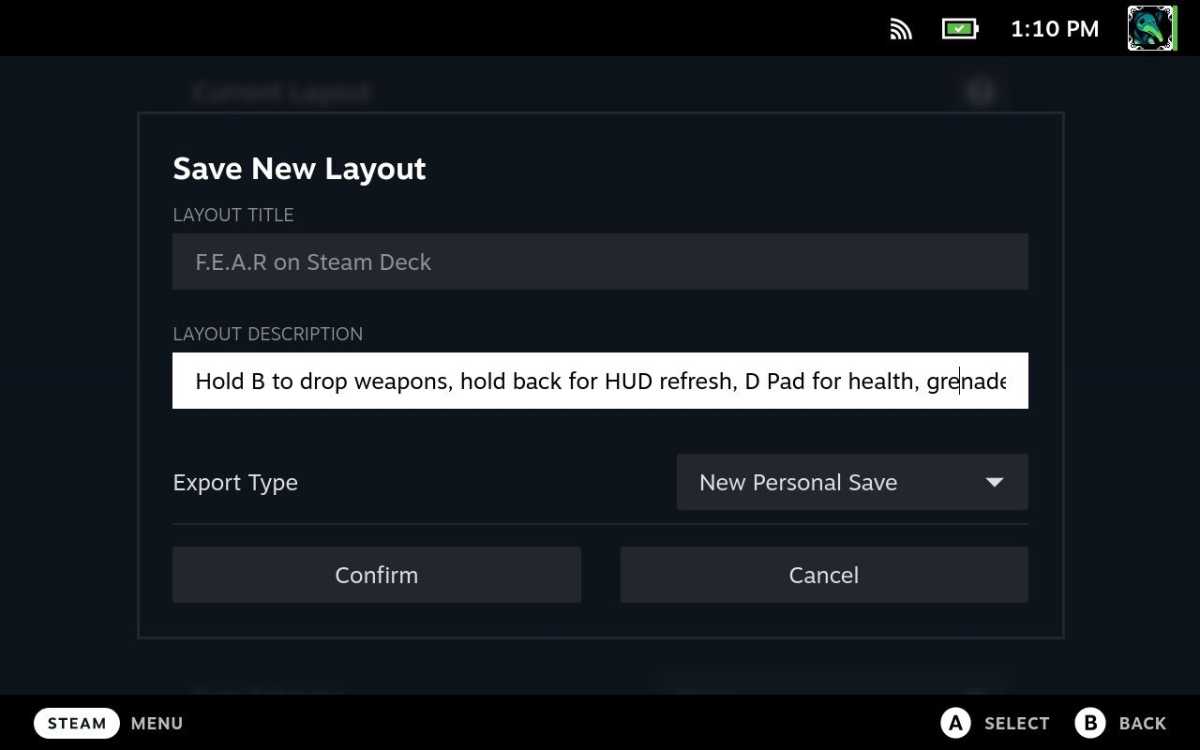
Once you’ve configured everything to your liking, go back to the Controller Settings menu and the ⚙ gear underneath your layout. From here you can either choose “Export” to save the layout on your device or “Share” to upload it for other folks to use as well. (More on that shortly.)
Jared Newman / Foundry
Jared Newman / Foundry
Jared Newman / Foundry
Give your layout a name and a description, then save it. It’ll appear in the “Your Layouts” tab on the layout selection screen, so you can always come back to it even if you mess around with alternative control schemes.
Advanced Steam Deck mapping options
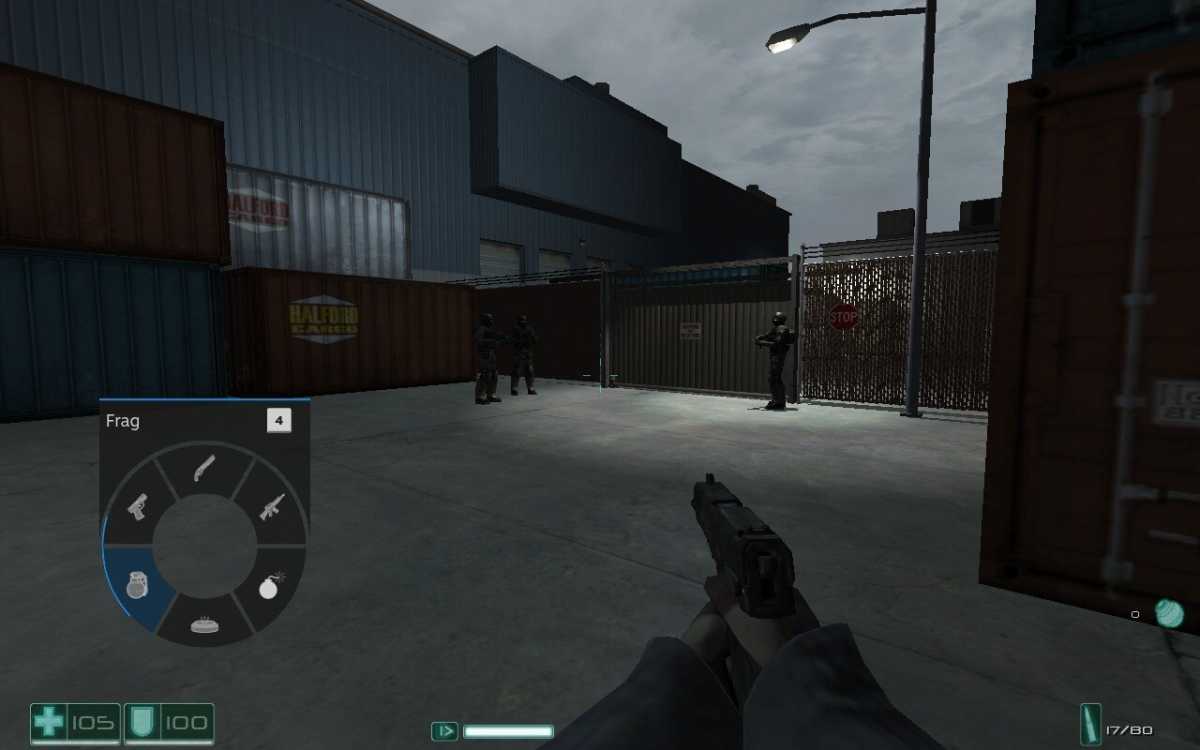
Yes, the Steam Deck lets you roll your own radial weapon selector.
Yes, the Steam Deck lets you roll your own radial weapon selector.
Jared Newman / Foundry
Yes, the Steam Deck lets you roll your own radial weapon selector.
Jared Newman / Foundry
Jared Newman / Foundry
The fun doesn’t stop there. Valve also offers a few advanced ways to optimize your PC games for the Steam Deck controller:
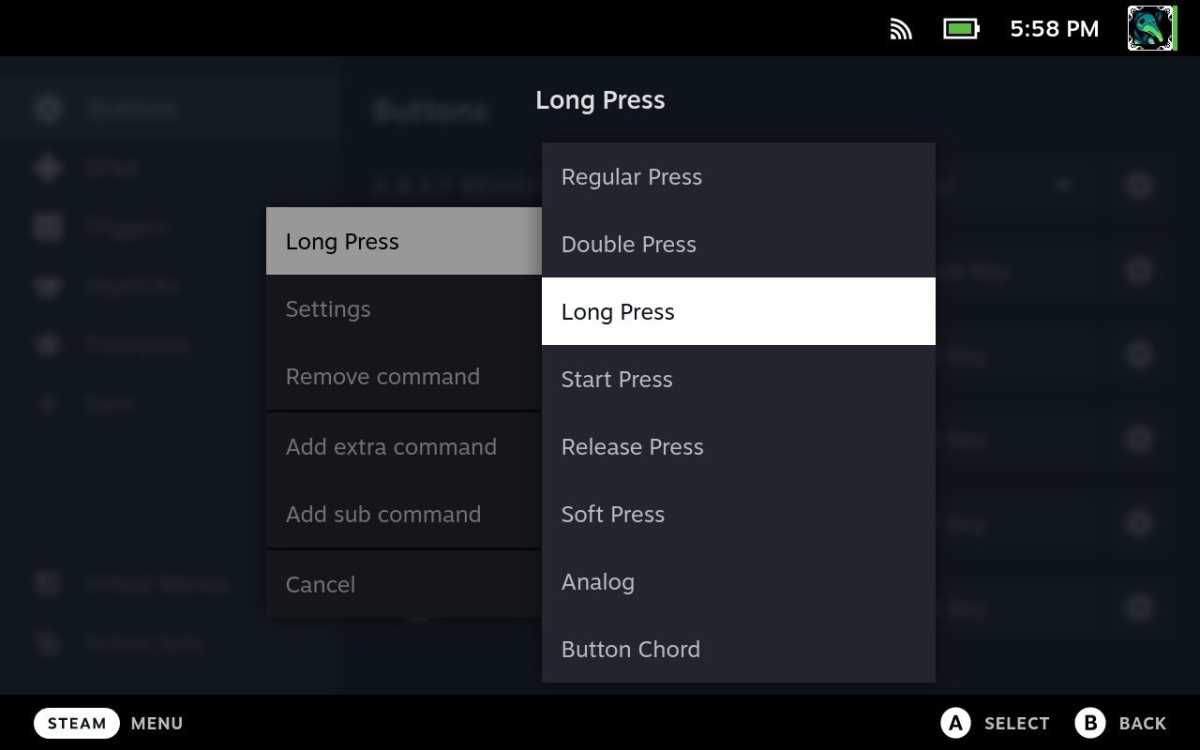
Secondary commands: For games where a simple button press isn’t enough, you can map additional key bindings behind a long-press or double-press. You can also map separate bindings for when you hold and release a button—perfect for shooters that toggle the ironsights with a trigger button when you’d prefer to hold it down instead.
Hit the ⚙ gear next to any button and select “Add Extra Command.”Choose which button to map it to, then hit the ⚙ gear next to the new command and select “Regular Press.”Choose to map the extra command to a long-press, double-press, hold, or release.
Jared Newman / Foundry
Jared Newman / Foundry
Jared Newman / Foundry
Virtual menus: This extremely neat trick lets you create your own radial menus for the touchpad, directional pad, or thumbsticks, complete with visual overlays that appear in the game. It especially comes in handy for shooters or MMORPGs where you’d normally switch between weapons through the number row.
From the layout screen, head to Virtual Menus, then select “Add Virtual Menu.”Give it a name that’ll help you identify it later, such as “F.E.A.R. Weapon Selector.”Choose the type of menu you want to create. Radial works best with the touchpad or thumbsticks, Touch Menu is just for the touchpad, and Hotbar is mainly for cycling through items with the D-Pad.

Jared Newman / Foundry
Jared Newman / Foundry
Jared Newman / Foundry
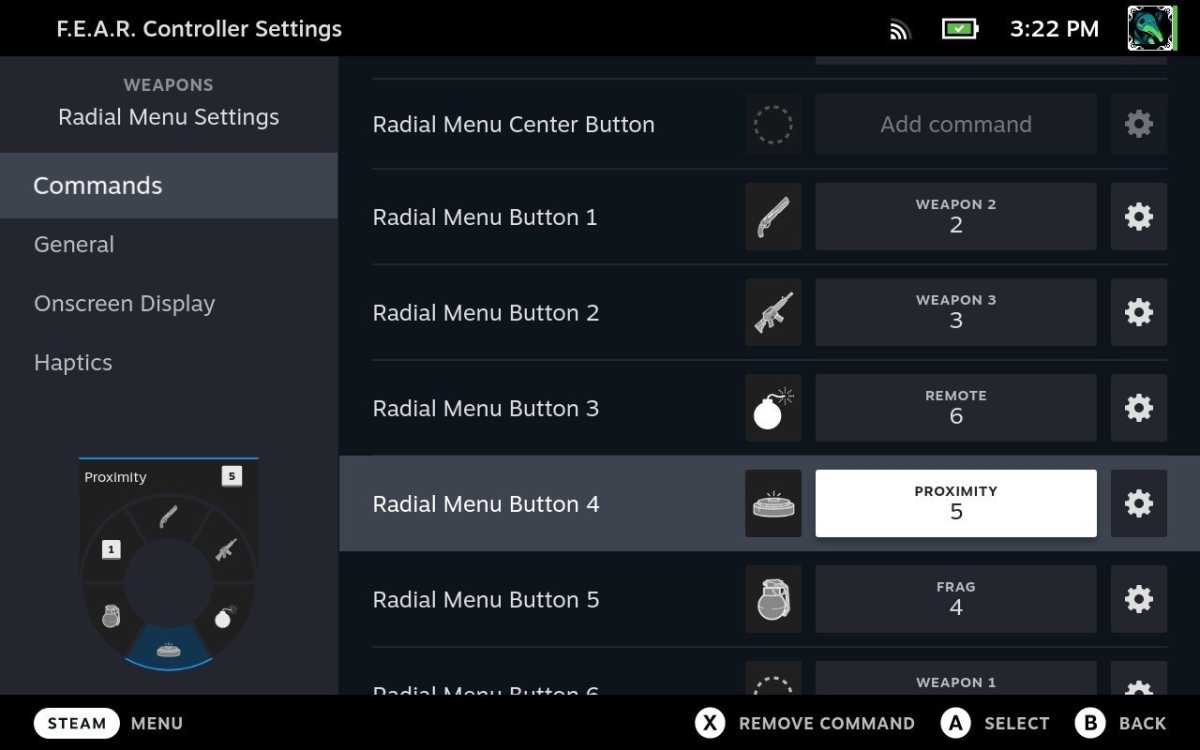
Hit the pencil button next to the newly-created menu.Hit “Add Command,” and choose the key you’d like to assign.Use “Add Virtual Menu Entry” to create additional items in the menu.Use the dotted circle next to each button to select an icon for each item. These icons will appear in the overlay during the game.
Jared Newman / Foundry
Jared Newman / Foundry
Jared Newman / Foundry
Optionally use the ⚙ gear next to each button and select “Rename Command” to give it a name that will appear on screen as well.Finally, return to the main remapping menu and assign a Steam Deck control method to the Virtual Menu. For instance, you can head to Trackpads, tap the drop-down next to “Left Trackpad Behavior,” and choose your newly-created menu from the list.
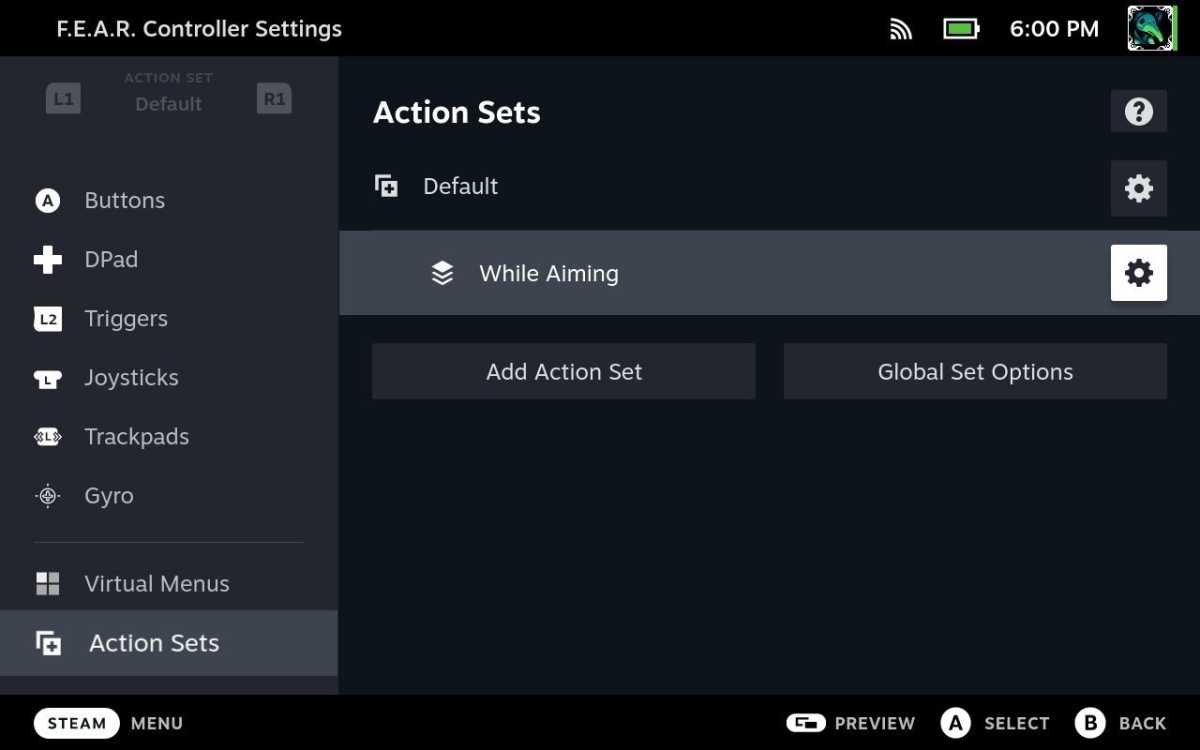
Action sets: This lets you switch to a different control scheme in response to a button press. A great example is reducing the joystick-to-mouse sensitivity when looking down the sights in a first-person shooter. Here’s how to set that up:
In the remap menu, head to Action Sets.Select the ⚙ gear next to “Default” and select “Add Layer.”Give the layer a name, such as “While Aiming.”
Jared Newman / Foundry
Jared Newman / Foundry
Jared Newman / Foundry
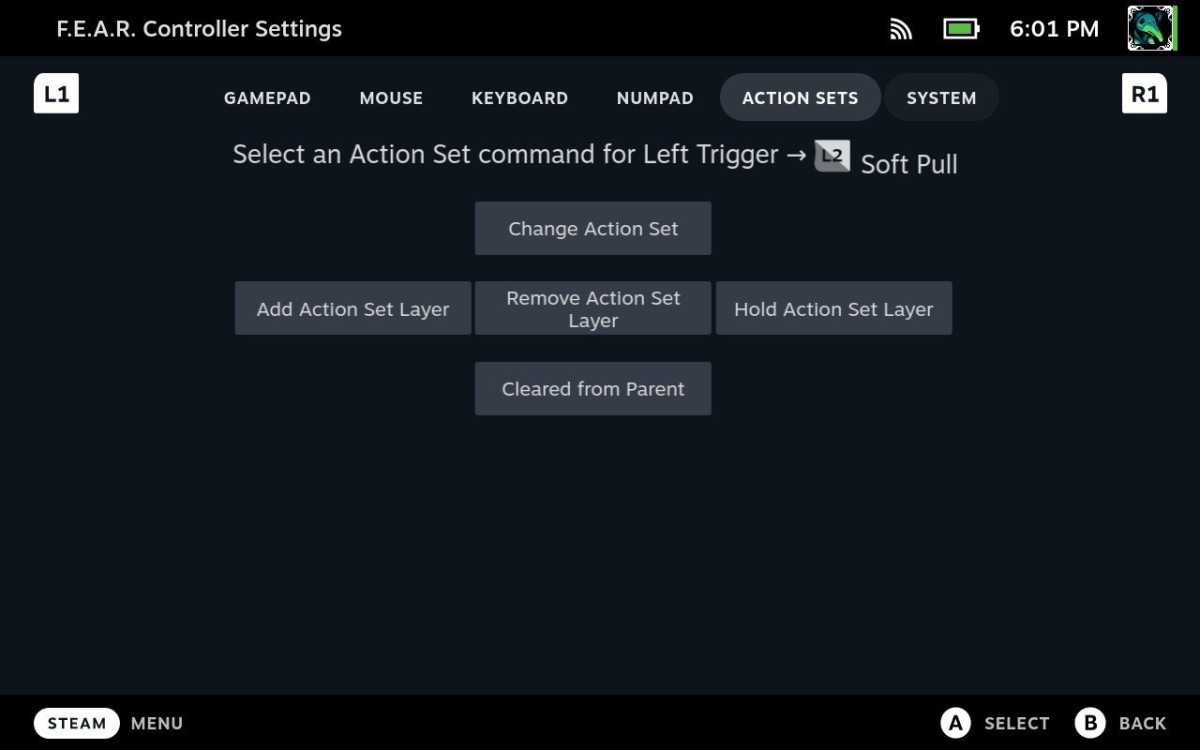
In the Trigger menu, hit the ⚙ gear next to “Soft Pull” and select “Add sub command.”Hit “Add command” to bring up the control selection screen.Navigate to the “Action Sets” tab and select “Add Action Set Layer.”
Jared Newman / Foundry
Jared Newman / Foundry
Jared Newman / Foundry
Select the “While Aiming” Action Set, disable the two blue toggles, and hit “Confirm.”Return to the remap menu and hit R1 so that “While Aiming” appears in the top-left of the screen.In the Trigger menu, hit “Add Command” next to “Soft Pull.”

Jared Newman / Foundry
Jared Newman / Foundry
Jared Newman / Foundry
Navigate to the “Action Sets” tab and select “Remove Action Set Layer.”Select the “While Aiming” Action Set and hit “Confirm.”In the Joysticks menu, hit the ⚙ gear next to “Right Joystick Behavior,” then lower the mouse sensitivity.
Community layouts: A shortcut (with caveats)
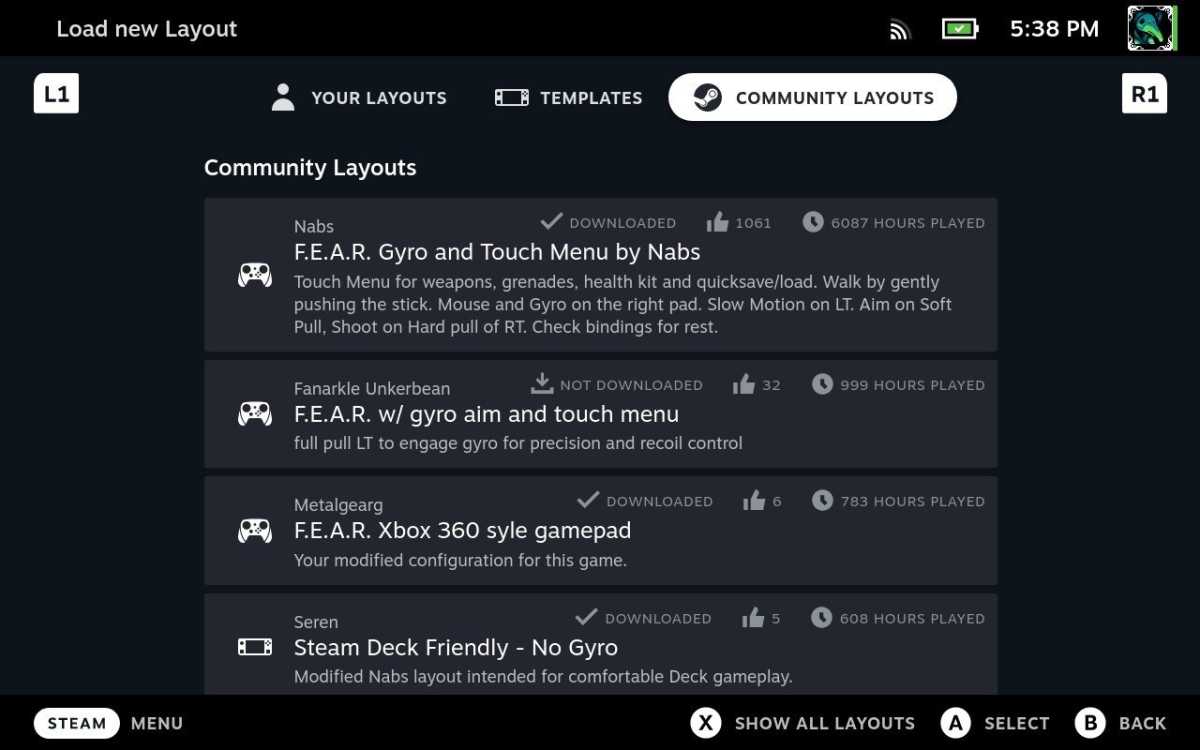
If all that just sounds like too much work for the sake of play, there is a shortcut: Just select one of the Community Layouts that other players have created. You’ll find this by clicking on your layout in the Controller Settings page, then heading to the “Community Layouts” tab.
Jared Newman / Foundry
Jared Newman / Foundry
Jared Newman / Foundry
The problem with community layouts is that you never know what you’re going to get, and I’ve seen some truly horrendous layouts even for games with straightforward control schemes. Community layouts can be a good starting point, but it’s still worth understanding the button remapper so you can make your own adjustments or start from scratch if need be.
While this is admittedly a lot to take in, a little experimentation is all it takes to get hooked. When everything clicks, you’ll realize you can create the perfect layout for pretty much any game on the Steam Deck, no matter how complex the control scheme.
Now, excuse me while I figure out how to set up X-Wing.
Author: Jared Newman

Jared Newman has been helping folks make sense of technology for over a decade, writing for PCWorld, TechHive, and elsewhere. He also publishes two newsletters, Advisorator for straightforward tech advice and Cord Cutter Weekly for saving money on TV service.
Recent stories by Jared Newman:
Is Windows antivirus software still necessary in 2023?How to get Microsoft Office 365 for cheapHow to use two-factor authentication to lock down your accounts the right way


