 Image: Rob Schultz
Working with ranges in Excel is a fast and simple way to identify, define, or refer to a single cell, a range (or group) of cells, a specific or constant value, or a formula. Then you can use those range names in your formulas or macros to replace values or cell references, or to quickly and more easily navigate through your spreadsheets and workbooks. It’s also a more efficient way to manage the various processes that you’ve created in your worksheets. For example, ranges are often named after the field (or column) names that define their contents.
Create Range Names
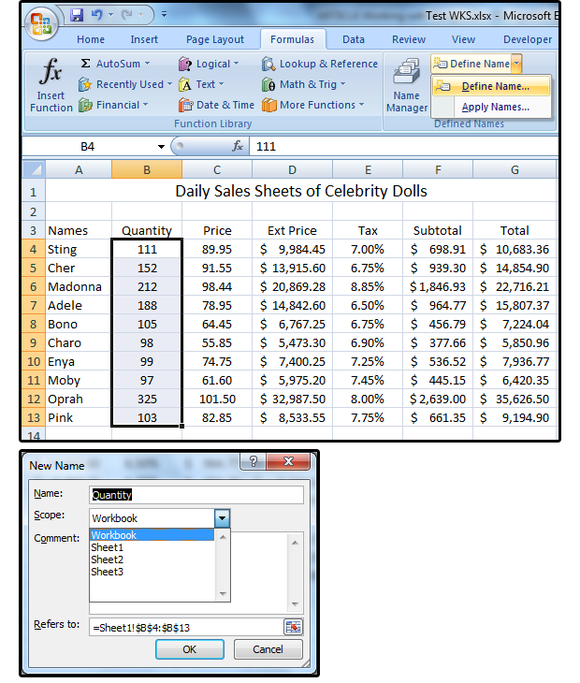
1. Select a range of cells in your spreadsheet (for example, in our sample, select B4:B13).
2. From the Formulas tab, click Define Name.
3. Notice that Excel has already entered the column/field name of the range you highlighted (even though that cell was not included in your range). If you’d prefer a different range name, enter that name in place of the name Excel suggested.
4. In the Scope field, select Workbook to make this range available to every spreadsheet in this workbook, or select one of the individual spreadsheets. If you’ve already inserted multiple sheets and named them, those sheet names appear in the Scope drop-down list.
5. Enter a comment, if necessary, then click OK.
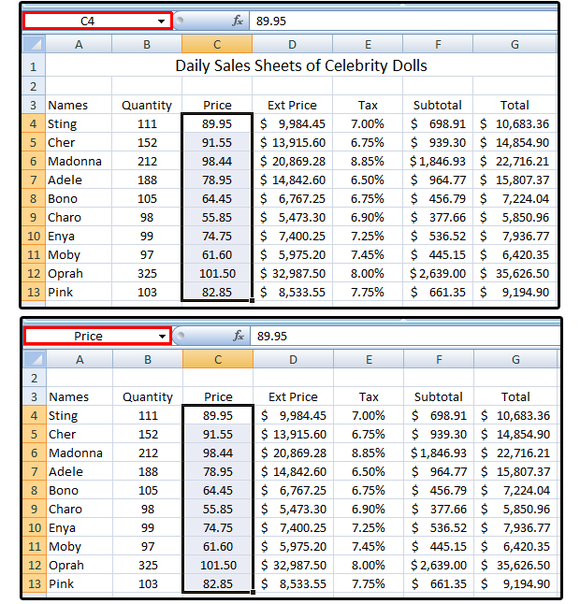
6. You can also just type in the range name. For example, C4:C13.
7. In the name box (the white data-entry box above columns A and B), type in the name you want to use to identify this range/column of cells. For example, enter the word Price, then click the Enter key.
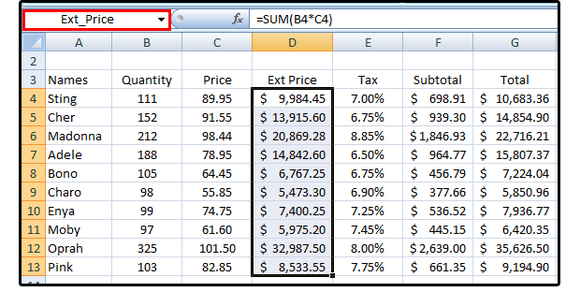
Notice that if your range name (or column/field name) is more than two words, you must enter an underscore in place of the spaces between the words. This is an Excel file naming convention held over from the DOS days. Actual filenames can use spaces now, but not range names.
Edit range names
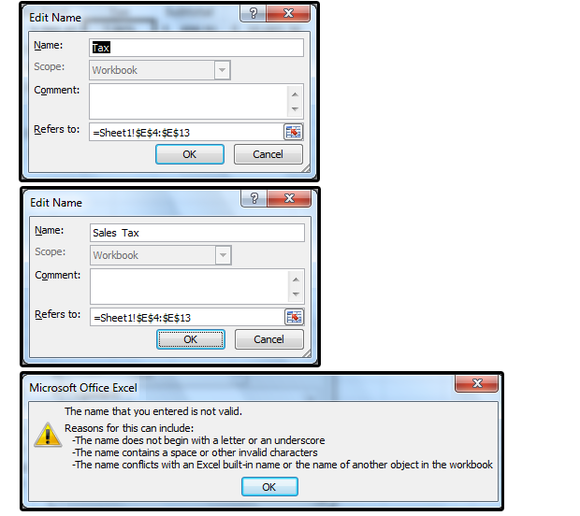
1. Editing a range name is easy. Select another range of cells such as, in our sample, E4:E13. Notice that the current range name is Tax. We want to change this to Sales Tax.
2. In the Defined Names group under the Formulas tab, click the Name Manager button.
3. In the Name Manager dialog box, select the range name you want to change and click the Edit button (in our case, select the range name called Tax).

4. In the Edit Name dialog box, type over the word that says Tax with the new range rame Sales Tax, and click OK.
5. A Microsoft Excel error dialog appears that says, “The name you entered is not valid.” Below that, it displays several reasons for the invalid entry. Click OK.
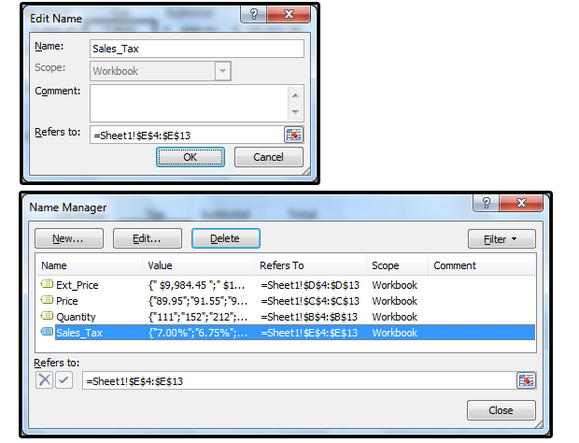
6. Re-enter the new range name Sales Tax, but don’t forget the underscore between Sales and Tax (no spaces allowed, remember): Sales_Tax. Then click OK.
7. The Name Manager dialog box reappears and displays the new range name. If you’re satisfied with the change, click the Close button.
8. If not satisfied, highlight the range name again and re-edit, or click the Delete button to remove it.
The benefits of Named Ranges
If you’re wondering, now what? The answer is to create some named range formulas.
1. Go to A15 and type Grand Totals.
2. Go to B15. From the Function Library group under the Formulas tab click the AutoSum button. Excel highlights the cells above B15, including the blank cell.
3. In the Defined Names group under the Formulas tab, click the Use in Formulas button and select the range name Quantity from the list. Notice how the highlighted range changes and now includes only the Quantity range.
4. Press the Enter key, and the total appears: 1,490.

Let’s try another one.
5. Go to A17 and type Averages.
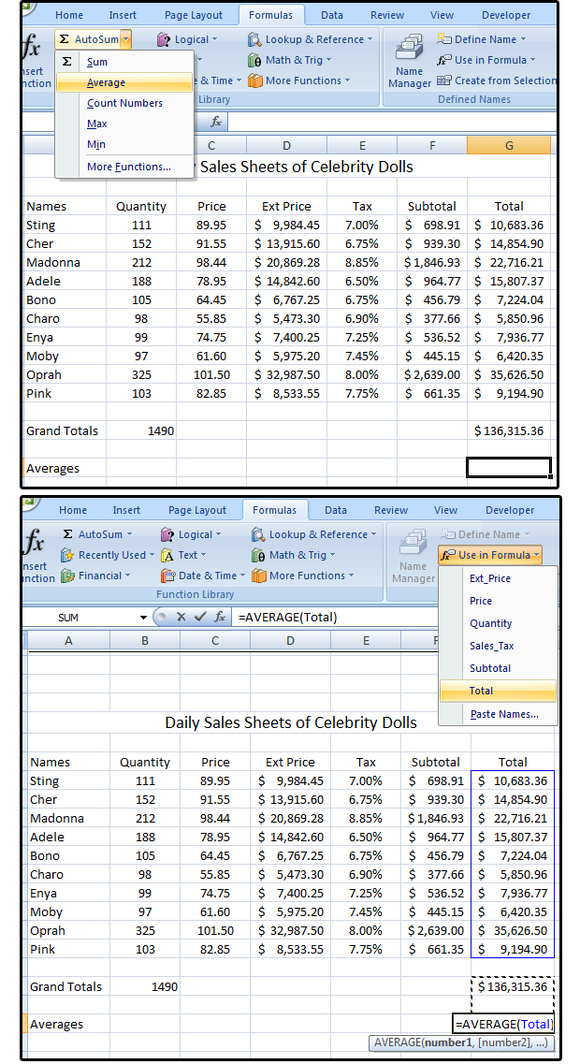
6. Go to G17. From the Function Library group under the Formulas tab click AutoSum, then select Average from the drop-down list.
7. In the Defined Names group under the Formulas tab, click the Use in Formulas button and select Total from the list, then press the Enter key. The average of this Total column appears: 13,631.54
Notes: If you save your range names to the workbook instead of the individual worksheets, you can create formulas that calculate your named ranges from anywhere on any spreadsheet in the workbook. This is particularly useful if you want to calculate formulas and ranges across multiple spreadsheets.
Dynamic Named Ranges
Dynamic named ranges expand automatically whenever you add another value to the range. This is an amazing trick because, once defined, your ranges are infinite, which means you’re not limited to the original values (or range of values) selected.
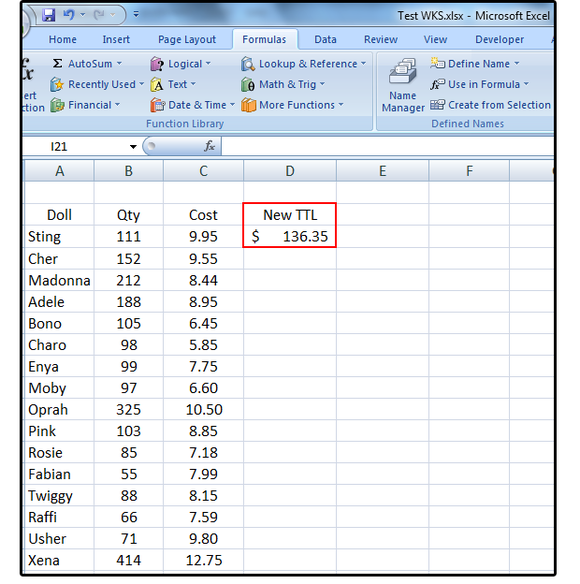
1. Make a copy of the “Daily Sales Sheets of Celebrity Dolls” spreadsheet. Delete columns D through G. Rename the Price column/field and range to Cost. Edit the Cost column to reflect how much it actually cost to make the celebrity dolls.
2. Move your cursor to D3 and enter the column/field name New TTL.
3. Go to D13 and enter a formula to sum the cost range. For example: From the Function Library group under the Formulas tab, click AutoSum > Sum (from the drop-down list).
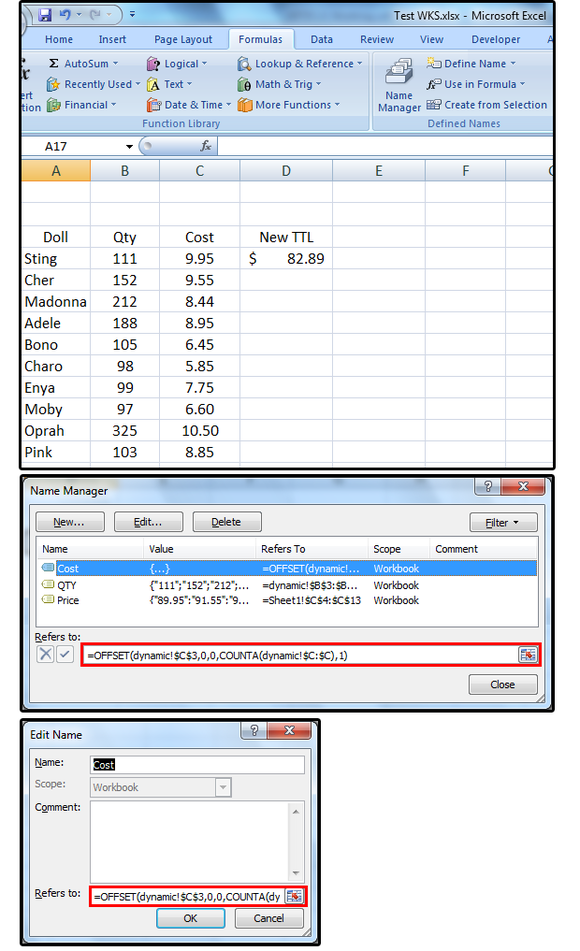
4. In the Defined Names group under the Formulas tab, click the Use in Formulas button and select Cost from the list, then press the Enter key. The sum of this range is $82.89.

Note: To expand the cost range automatically as new values are added, you must add the Offset function.
5. Go to D3. In the Defined Names group under the Formulas tab, click the Name Manager button. Select Cost from the list, then click the Edit button.
6. In the Refers to field box, enter this formula: =OFFSET(dynamic!$C$3,0,0,COUNTA(dynamic!$C:$C),1)
7. Enter several new numbers in the Cost Range/column and watch the New TTL (totals) change.
