
 Image: Microsoft
Anything that speeds up email communication in Microsoft Outlook has to be a bonus. Typing and retyping the same paragraphs, the same information, explanations, directions, instructions, and so on is half the problem—one that can be easily solved with these five, easy, time-saving tips.
1. Managing one or more signatures
You should never have to retype your signature line, even if you have multiple versions of your contact information—such as one for work, one for home, and one for your side business.
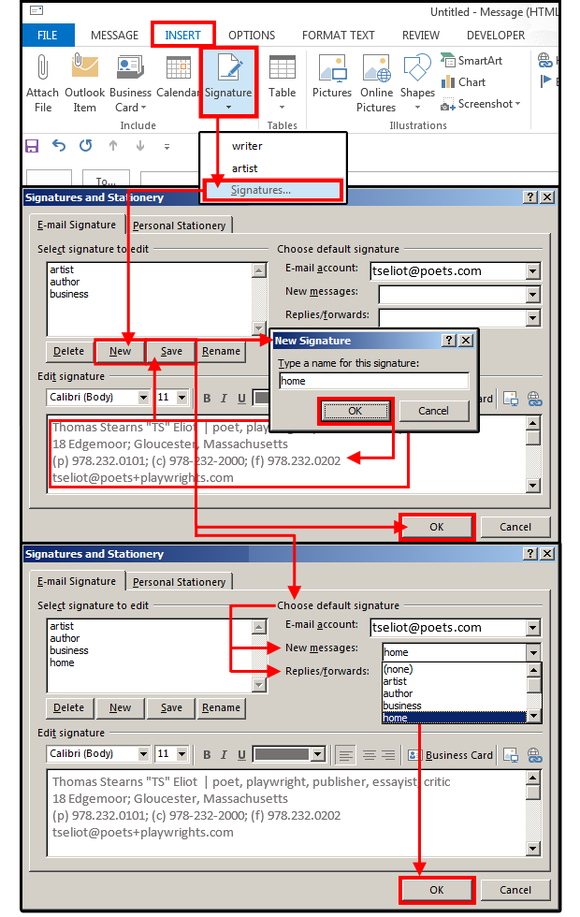
Open a new email, select the Insert tab, click the Signature icon, and choose Signatures from the dropdown list. In the Signatures and Stationery window, click New. Enter a name for this signature in the New Signature dialog and click OK. Type the contact information for this new signature in the Edit Signature box, click Save, then click OK—unless you want this signature to be the default. If you want this signature to print on every email, select it from the New Messages and Replies/Forwards list boxes under Choose Default Signature, and then click OK.
To insert a signature on your email, position your cursor, select the Insert tab, click the Signature icon, then choose one from the list. To change a signature, right-click anywhere on the current signature and select another one from the popup list.
 JD Sartain
Save time and use custom email signatures instead of retyping your contact info.
2. Create an Outlook business card
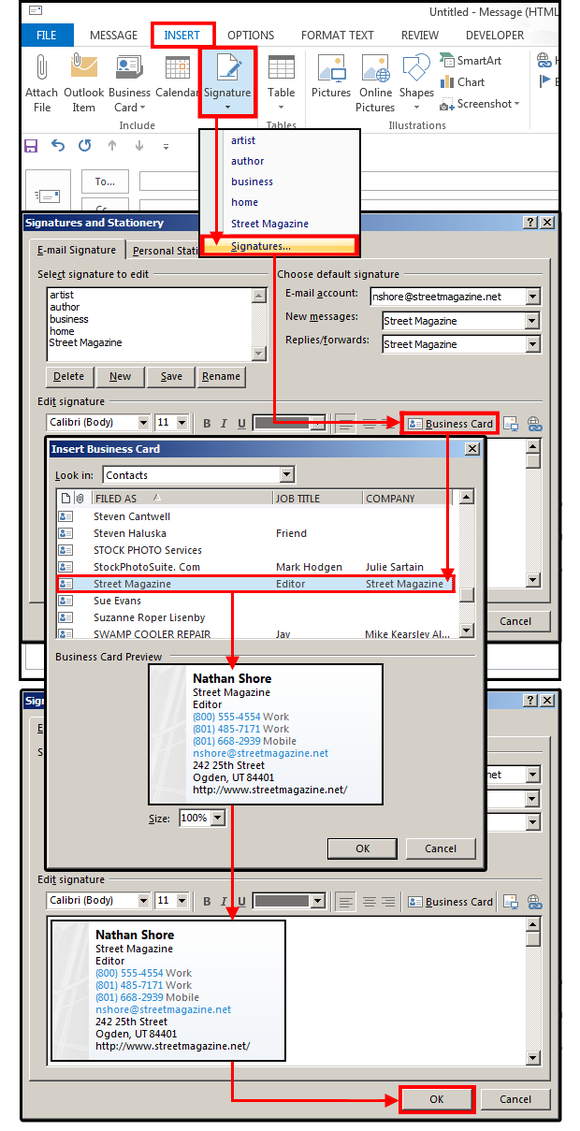
The other option for a quick and more professional signature is to use a business card. Open a new email, select the Insert tab, click the Signature icon, and choose Signatures from the drop-down list. In the Signatures and Stationery window, click the Business Card button. In the Insert Business Card window, scroll down to the contact name you want added to a business card. When the correct business card appears in the Edit Signature box, click OK.
To insert a business card, select the Insert tab, click the Business Card button, then choose one from the list. The card inserts at the cursor position. Stay tuned for another article about how to customize your Outlook business cards.
 JD Sartain
Add a custom business card instead of typing your contact information at the end of each email.
3. Use Quick Parts to create reusable text blocks
If you’re retyping the same paragraphs or blocks of texts, then you’ll really like this cool feature. Quick Parts (previously called Auto Text, and also called Building Blocks) is a way for you to copy and save blocks of redundant text into a Gallery where you can retrieve and insert them instantly into your current email.
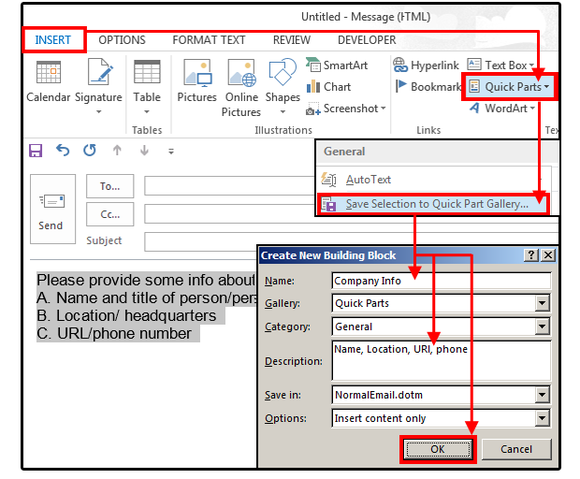
Type a block of text that you use over and over, or locate a previous email with a message you’ve retyped a hundred times. Highlight the text block, select the Insert tab, click the Quick Parts button, then click Save Selection to Quick Parts Gallery from the drop-down menu.
In the Create New Building Block dialog box, type a name for your Quick Part block of text; skip the Gallery field (because you want this saved in the Quick Part Gallery). For Category, General is fine, unless you want to create some custom categories based on the types of text blocks you save. For Description, enter a brief description about this text block. Don’t change the Save In field. And finally, select a placement option from the last field Options, and click OK.
 JD Sartain
Save repetitive text blocks in Quick Parts to access and re-use over and over.
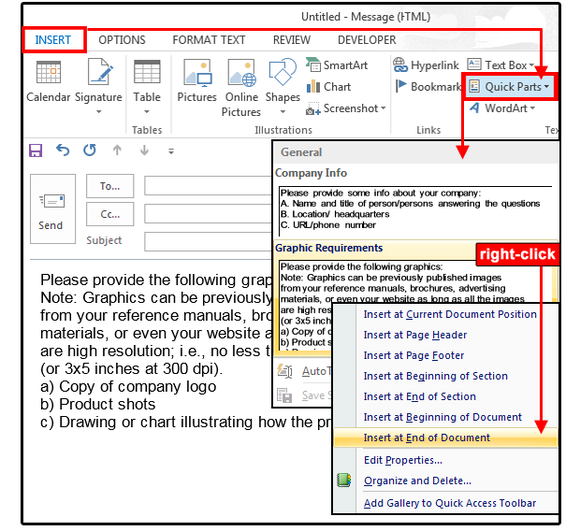
To insert a text block, select the Insert tab, click the Quick Parts button, then select the applicable text block from the list. The block inserts at the cursor position. You can also right-click the applicable text block and select an insert location from the list. in both cases, the text block drops into the email immediately.
 JD Sartain
How to insert text blocks (Quick Parts) into your emails.
You cannot currently edit a text block in Outlook 2013. If you need to change the text in a block that’s saved in the Gallery, you must retype and resave the edited text block, then delete the old one.
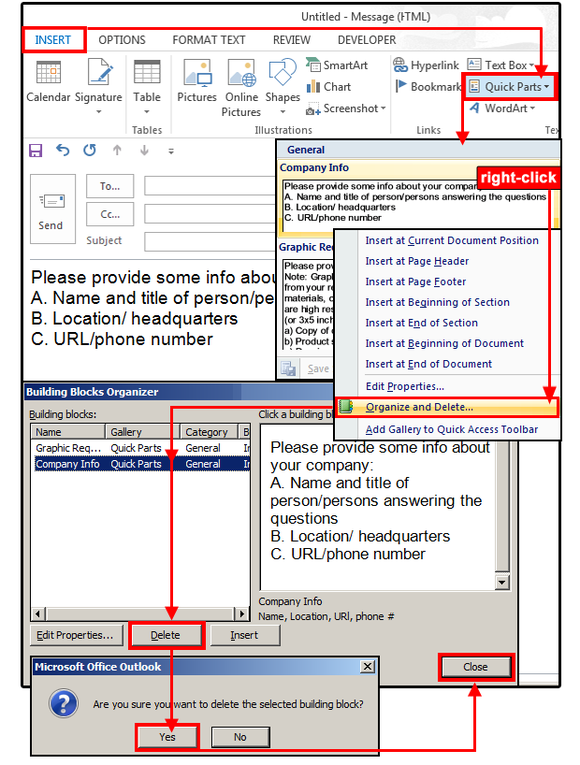
To delete an old or unused text block, select the Insert tab and click the Quick Parts button. Right-click the applicable text block and select Organize and Delete from the list. In the Building Blocks Organizer window, ensure the correct text block is selected, then click Delete > Yes > Close.
 JD Sartain
How to delete old or unused text blocks for your Quick Parts gallery.
4. Make templates for repetitive emails
If you have multiple paragraphs, a full page, or several pages of repetitive text, forget the Quick Parts text blocks and create a Template instead. For example, proposals, bids, marketing info, product updates, client queries, and questionnaires are all “form” types of data that can be saved and reused as templates.
To create an email template, open a New email (or press Ctrl+Shift+M) and enter the “form” content, or open a current email with the content you want saved as a template. Select the File tab, click Save As, enter a template name, select Outlook Template from the Save As Type list, then click Save.
Note: Templates are saved in: C:usersusernameappdataroamingmicrosofttemplates.
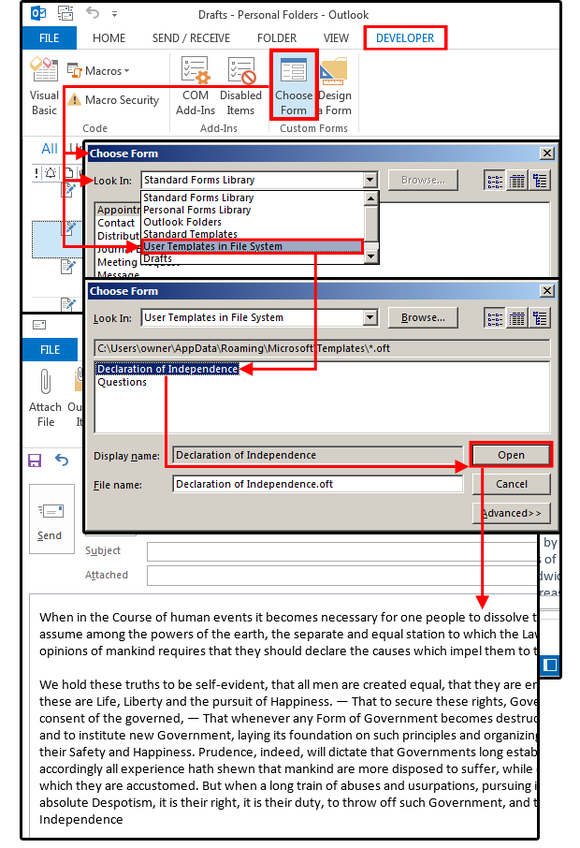
To open and use your templates, select the Developer tab, then click the Choose Form button. In the Choose Form window, click the arrow on the Look In field box and select User Templates in File System from the list. Click your template, then click Open, and the template email opens immediately. If you need to make changes, edit the template you just opened and resave it using the same instructions above.
 JD Sartain
Use templates to save and reuse long, full-page or multiple page emails.
5: Email your calendar
If you use your Outlook calendar to keep track of appointments, then this feature will come in handy. Instead of trying to plan and synchronize appointments with your friends and colleagues, just email your calendar directly to them.
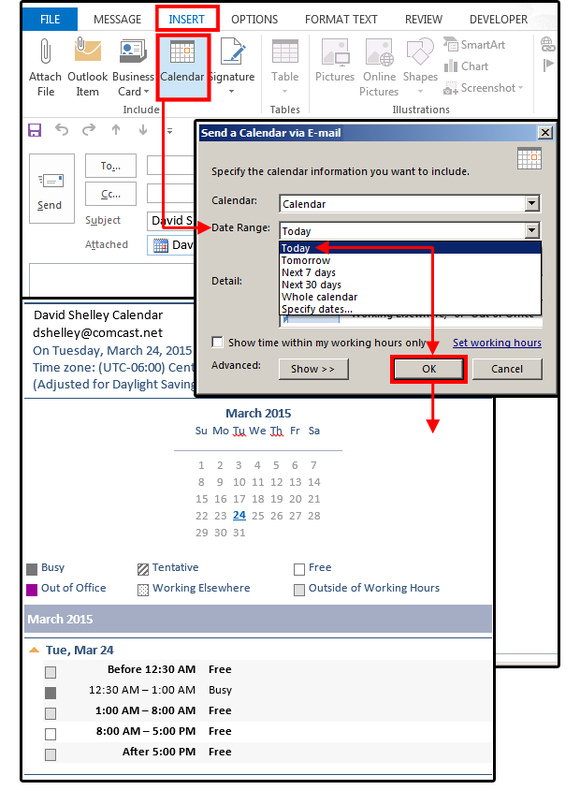
Open a new email, select the Insert tab, and click the Calendar button. In the Send a Calendar Via Email dialog box, select the date range and click OK. The calendar drops in and shows your entire schedule for the data range you selected.
 JD Sartain
Send your colleagues a calendar instead of typing out your schedule.


